04 December, 2017

5 Succulent Christmas Ideas!


Stuck for inspiration on what Christmas decorations to include around your house this year? What about including succulents?! Here are some wonderful ideas on how to incorporate succulents onto your Christmas table:


Create a Living Succulent Christmas Tree Tutorial
by Maya Marin (eHow)

I've thought about making a succulent tree before using a cone shaped florist block, but this is so much better! By using chicken wire and sphagnum moss, this tree will not only look pretty just for the holidays, but with some occasional maintenance can last for months and months afterwards!

A little tip I have picked up that could be useful here is that I have never once used pre-made floristry pins. I find bending a bit of wire in half works just as well, and a roll of wire purchased from your local hardware store can make hundreds of pins, saving you a little bit money.

I really like the idea of incorporating the odd bunch of plastic red berries here and there. You know the ones, you can get them from pretty much any store selling Christmas decorations. Not expensive at all, and it will give your tree just that touch of red among the green shades of the succulents.

From Pinterest

I just love succulents mixed with candles. This is a great idea for a large Christmas table. A centre piece like this could be made from an inexpensive wooden box found at a discount store. Jazz it up with watered down white or light blue paint for that antique look.

This could be a temporary display, made up with sphagnum moss and succulent cuttings, or for a more permanent display, you could drill holes in the bottom and plant established succulents with a cacti and succulent potting mix. I would recommend lining the wood with plastic and poking holes into that as well. This just protects the wood from rotting, whilst still letting the water drain away.


From Pinterest
Speaking of Christmas table centre pieces, This succulent wreath with a candle in the middle would look very festive for Christmas lunch or dinner. What a brilliant idea, incorporating a string of battery operated led fairy lights for that touch of drama. Learn How to make a succulent wreath.


From Pinterest
Individual gifts that also serve as placeholders for the Christmas table? Yes, please! Who could resist a little keep sake they can take home after eating all that Christmas pudding. You can buy all sorts of pretty card at any craft shop these days, and with a nice pen you can write names onto them (or if you're like me and possess absolutely no calligraphy skills, you can cheat and use your printer :P ). Glue onto a bamboo skewer and spike into the succulent pot, or simply attach the placeholder card with a ribbon tied around the pot.


DIY | glitter succulent planters by Lolly Jane
A great way to pimp up a humble terracotta pot. Some paint, decoupage glue and glitter is all you need to make these fabulous succulent Christmas gifts. Full instructions can be found on Lolly Jane's Website.

I hope that provides you with a little inspiration on how to incorporate succulents into your Christmas decorating this holiday season. For more inspiration and ideas on Christmas succulent projects, check out our Pinterest board - Succulent Christmas Ideas. If you have any succulent Christmas ideas or projects you would like to share, please comment below!

15 November, 2017

My first Living Succulent wreath - How to make your own (DIY)


Here is a little video I created of my fist attempt at a living succulent wreath.

Now Kaye is the one who puts her artistic skills to work here at Fickle Prickles to create all the wonderful living wreaths that we sell online and at the festivals we attend. So the other day when I was sitting in front of the computer, writing up instructions for our succulent wreath kits, I thought to myself  'I need to get a true idea of how this is done... I should make my own!'

I was a little bit hesitant filming the process, as I was so sure it was going to turn out a big gobbelty-goopy mess. However, with Kaye pointing me in the direction of what plants and cuttings to use, I'm quite happy with how it turned out!


I hope this shows just how easy it is to put one together. The wonderful thing about using fishing line is that it's invisible - so you can use quite a lot of it without ruining the aesthetics of the whole thing.

The wreath in the video was created with a small frame - about 20cm in diameter - But we do sell larger frames in our store. Larger ones will need more succulents to fill it out (obviously). This small one took 6 succulents in 50mm pots (3 rosette types and 3 fillers), and then we used a handful of cuttings to fill the wreath out. 

The succulent species I used in the wreath are:

Echeveria 'Domingo'
Sempervivum 'Weirdo'
Echeveria 'Dondo'
Sedum acre aureum
Crassula marginalis var. minuta variegata
Sedum 'Gold Mound'
Crassula species
Crassula ovata var. undulata
Aeonium haworthii
Sedeveria 'Starburst'  and
Something purple (possibly a sedeveria)


Two weeks on and the cuttings haven't quite established enough for me to hang it up vertically yet. A couple more weeks should do it. 

As it has been quite warm lately, I have been watering it once a day, thoroughly with a hose. I would advise against simply misting it, as the moss dries out rather quickly. Dry moss doesn't look as appealing in my opinion, and the added moisture retained in the moss from watering it with a hose will help the succulents grow and thrive for several months to come. No need to worry about the succulents rotting, as the moss doesn't stay sopping wet for very long.


Creating a wreath in this way means that it wont just be a temporary display, but something that can live and thrive for several months to come. Other maintenance tips I can suggest would include not leaving the wreath out in the full sun, applying a seaweed solution to give the plants a kick start, and pruning often to keep nice and compact.

I think instead of hanging this wreath vertically, I am going to buy a red plate to rest it on, and put a large white or gold candle in the middle and place it on our family's Christmas table.

02 October, 2017

Fickle Prickles 10th Birthday!


It is very hard to believe that it was this month 10 years ago when Kaye and I stood in line at the Business Registrar Office to officially register Fickle Prickles as a business. Wow, does time fly when you are having fun.

From humble beginnings we grew. To start with in 2007, we attended the Kalamunda Markets each month -  Packing up the back of the ute with a gazebo, a single table, plants and the living gifts we potted up during the course of the month:


Just over a year later, in early 2009, we officially launched our online store:


Ahh, the green background! :P

With both of us still working and studying full time, we kept plodding along - Each month attending the markets and each week delivering & posting online orders. We worked after hours and on the weekend; sometimes well into the night. We propagated and potted and sourced new plants, expanding our range as best we could, when we had spare time.

In 2015 we attended the Perth Garden Festival for the first time, having an absolute blast designing and creating our succulent display:


We have kept this tradition going each following year, designing a display based on a theme - 2016 was 'Under the Sea' and 2017 was 'Miniature Gardens'.


Also in 2015 both Kaye and I gave our notice at our respective jobs, and surged on with the business full time. In 2016 we redesigned our branding to what it is today, and developed a new online store and website.

Both Kaye and I are incredibly humbled to be able to work each day, on our own venture, doing what we both love to do. A big, huge thank you to all our regular customers who have supported us over the last 10 years.

What an adventure! Highs and Lows, we wouldn't change a thing.  What will the future bring? Only time will tell. Bring it on!


To Celebrate the double digits, we will be giving away some prizes and having a special birthday sale sometime in October. To find out more, and to be in the running for these delectable goodies, check out our Facebook page.

04 September, 2017

Tools for Handling and Potting Prickly Cacti

We just have to share Gardening Australia's video as we use Millie's 'high tech' tools for handling cacti as well. To watch the video, head to Gardening Australia's website:

http://www.abc.net.au/gardening/stories/s4708916.htm


Some other tools that we find incredibly useful when re-potting cacti are...

Chopsticks! Great for smaller, petite cacti that have sharpies. Who knew that that collection of chopsticks in the kitchen drawer from all that takeout would come in handy in the garden.

Cant use chopsticks? Tongs are just as great. Especially the ones covered in rubber. The rubber softens your grip on the cactus and mimimises damage. Mini tongs are useful for smaller cacti the larger ones for medium sized cacti.

Use carpet for the big fellas. Same concept as the newspaper, just on a larger scale. Wrap the carpet around the trunk, and you can gently hug and lift them into position.

Thank you Millie and the team at Gardening Australia for the great video!


30 August, 2017

Perth Garden Festival 2017

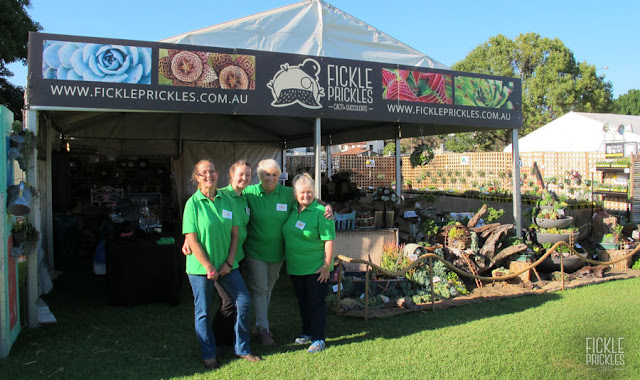
Fickle Prickles at the Perth Garden Festival 2017

Well, that wraps up another year at the Perth Garden Festival. Wow, how much fun we had this year. There was reported to be over 30,000 people through the gates over the 4 days and the whole festival was humming. Great stalls, good food, interesting plants on offer. Who doesn't love that?! We really loved talking to everyone who came through our site. It was lovely to chat about what projects and plants everyone was interested in, and helping to choose what succulents suited their needs.

OUR DISPLAY...

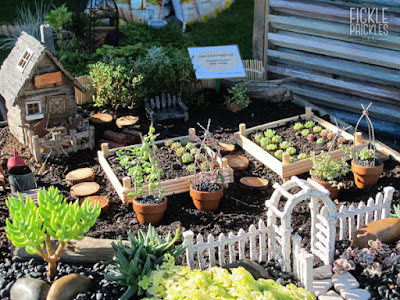
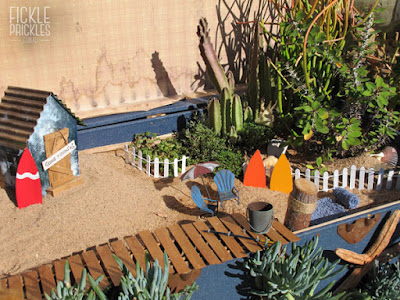
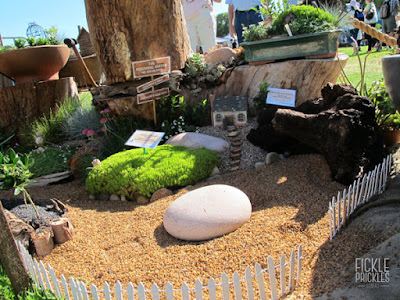
This year, our display had the theme of miniature gardens. We created several mini gardens throughout the display, tucked in to various props and furniture.


Succulent miniature farm garden in wheelbarrow


 We created a miniature farm in an old, rusted wheelbarrow. We used String of Pearls to make mini pea obelisk, and tiny sempervivum rosettes for cabbages in the veggie patch.

Succulent miniature garden beach scene in large chest

Succulent miniature garden beach scene in large chest


Our beach display, complete with jetti and handmade fishing rod (made by yours truly...) was planted out in an old blue chest you may recognise from our under the sea display form last year. We decked out the ocean with Senecio Chalk Sticks and the back corner with an Orbea and Euphorbia milii.

Succulent fountain miniature garden


Succulent fountain miniature garden

Succulent turtle full of sempervivum

Our succulent fountain took some time to assemble and plant out, I can tell you! The top tier we planted up quite a few months back so it had time to establish. We included a grey miniature mansion to complement the concrete grey fountain. Stanley, the turtle decked out in sempervivums made his third grand appearance at the festival. Each year, the sempervivums get more lush and compact.

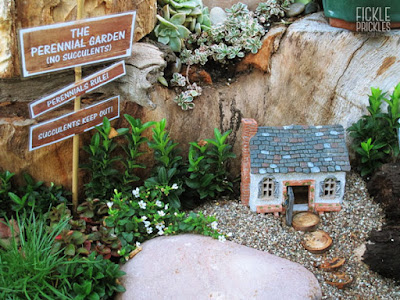
Perennial miniature garden

Perennials rule! Succulents keep out! A little house on the hill, surrounded by perennial species. Here we have used Sagina for that luscious hill of lawn.

Succulent pot spill - Echeveria glauca
Succulent Terracotta pot man - crassula muscosa
Succulent miniature garden terracotta hobbit house

A succulent pot spill using Echeveria glauca. Bruce, the terracotta pot man with Crassula muscosa var. muscosa for hair, and a terracotta hobbit house.

PERTH GARDEN FESTIVAL 2018...

We have been busy bees planning our display for next year. What will be the theme? You will just have to wait and see! Hopefully it will provide ideas and inspiration on how to incorporate succulents, perennials and miniature gardens into your home and backyard.

To find out more about the Perth Garden Festival 2018, head on over to their website: perthgardenfestival.com

Succulent Wedding Favours


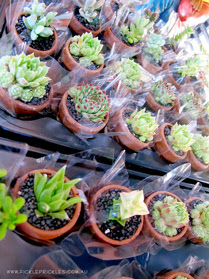
Succulents make the most fantastic wedding favours or Bonbonniere. They are stylish, charming and are something that your guests can take home as a long lasting memory of your special day. They can last for years after your wedding day, and can serve as a lifetime reminder of your marriage.

They are suited to indoor and outdoor wedding receptions and can be displayed in lovely and inventive ways.

Pots can be painted, covered in hessian or brown paper, or kept ala natural. You can add a lovely tag that says your names and a date, or a simple thank you message. They can be used as a name placeholder for each seat at a table. Tags can be tied on with twine or raffia, or simply placed on a stick and made to look like a flag.

For wonderful succulent wedding favour inspiration and ideas, head on over to our pinterest board: Succulent Wedding Ideas.


OUR SUCCULENT WEDDING FAVOURS:


Succulent wedding favours displayed on a tiered cake stand.

Mini succulent wedding favours with table placeholders.

Mini succulent wedding favours.

Cacti wedding favours in terracotta pots.

Our favours dressed up in hessian and a cute label. Photo: Monica Defendi Photography.
Our favours dressed up in hessian and a cute label.
Photo: Monica Defendi Photography.

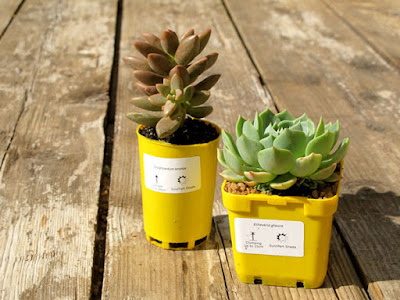
Succulent wedding favours in our yellow pots. Dress these up with hessian or lace for a budget friendly gift.
Succulent wedding favours in our yellow pots.
Dress these up with hessian or lace for a budget friendly gift. 

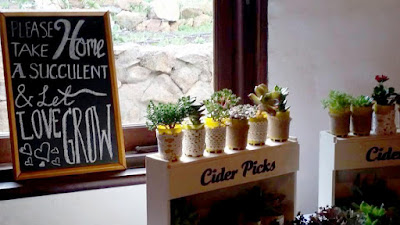
Succulent wedding favours dressed up with lace and a beautiful chalkboard sign.

To enquire about succulent favours for your wedding or event in Western Australia, please contact us at sales@fickleprickles.com.au.

Potted Succulents and Spring - A 'To Do' List


Spring is nearly upon us, and it is a great time to get out in the sunshine and tend to those potted succulents!

Now is the time to weed - Don't sigh, you know it's time... Pull out all those bubba weeds that have shot up. Do it now, before those pots become more weed than succulent. Your plants will thank you for it.

Tidy up - Remove any dead or rotting leaves. This is especially true for your rosette types (sempervivums/echeverieas) that grow from the centre out and have old, rotting leaves on the outside and underneath the rosette. It's important to remove these to promote new growth and ensure the rot wont spread to the main plant.

Re-pot if necessary - Spring is the perfect time to re-pot those succulents that have been sitting in the same potting mix for several years, or those who's potting mix has collapsed to well below the lip of the pot. Applying a fresh mix is a great way to give your plants a new lease at life, you will be providing them with an abundant source of nutrients, and it will also help with the drainage of your potted succulent, as that old mix has probably become a little water repellent over time.

Now is the time to fertilise - Speaking of nutrients, now is the perfect time to re-apply that control release fertiliser. You can also apply a seaweed or blood and bone solution to give your plants a kick start to spring.

Mulch - Mulch isn't just for the garden. Potted succulents will benefit just as much from a good layer of gravel. Not only does it make the plant 'pop' and look absolutely stunning, it also helps prevent water evaporation from the soil. It provides the roots insulation from the suns rays, which is vital in WA's intense summer heat.

Sun - Spring is the main growing season for most succulents. So make the most of it! Make sure your potted plants are receiving a decent amount of sunshine. Place them in a well lit area and they will burst into life.

29 August, 2017

Succulent Bonsai Planter Tutorial


Learn how to create your own simple, yet stylish succulent bonsai planter with this short tutorial video we created.

What you will need:

- Succulent plants (we used 50mm Classics)
- A large pebble
- A bonsai pot (must have a drainage hole!)
- Cacti and succulent potting mix
- Top dressing (such as gravel)
- Control release fertiliser
- Secateurs or cutters

What's great about bonsai pots is that they are shallow. Succulents tend to struggle in deeper containers, so shallow ones are the perfect size to keep their feet happy and well drained. Bonsai pots almost always have drainage holes too, which are important for succulent planters.

When choosing what plants to include, consider contrasting different heights, colours and textures.
Here we combined an upright, tall Crassula ovata 'Blue Bird', with a short growing Sedum species ground cover. The blue offers a nice contrast to the bright green and red of the groundcover, and we have both large, flat leaves and compact, tiny leaves in our combo.

Use a good quality, cacti and succulent mix. I can't stress this enough. Your normal potting mix retains too much water for succulents; they need more drainage than a normal mix can provide. You can improve the drainage of a cacti and succulent potting mix further by incorporating perlite into the mix.

It is up to you what top dressing to use. We used a fine grade black gravel, but other good toppings include pea gravel, fish tank pebbles or even sphagnum moss. Not only does the top dressing look fantastic and finish off a beautiful project like this, it helps protect the soil from the elements. It can keep the plants roots cool in summer as well as warm in winter.

Include a control release fertiliser into the mix when your planting your bonsai pot and that will keep your plants happy for at least 6 months. You can also use a seaweed solution or blood and bone solution to give them a kick start.


Care Information:
You can keep your bonsai planter either inside next to a window, or outside in a part shade position. It can be put in a full sun position once it has become established, but may still need to come under the verandah on extreme summer days.

Water your bonsai planter once a day in the summer or a little less often if keeping indoors. You can cut watering right back during winter to once a week, even once a fortnight depending on its location.

Prune often to keep compact and lush. This will also help to give the 'Blue Bird' a bonsai tree appearance.


Get succulents and supplies for your next succulent project at www.fickleprickles.com.au.
Delivery to anywhere in Western Australia.

21 June, 2017

Winter Delights - Sedum makinoi 'Limelight'

It's winter! And do you know how we can tell? Because of the stunning colours that come out in our succulent babies! we just have to show everyone the colours that are coming out in Sedum makinoi 'Limelight' at the moment:


Usually lime green in colour (hence the name limelight), these little beauties are showing some amazing golds, burnt oranges and even browns in this cold weather. Such a stark contrast to the bright green colour you see in the foliage during spring and summer:


19 June, 2017

What are the differences between Crassula capitella and Crassula capitella ssp. thyrsiflora?


We have been receiving a lot of queries as to the physical differences between a Crassula capitella and a Crassula capitella ssp. thyrsiflora - So we thought we would share this comparison photo!

Crassula capitella ssp. thyrsiflora is commonly known as 'Red Pagoda'.


It has quite small triangular leaves that stack just like the original capitella, but just on a smaller scale. The plant itself is more compact, and will mass and clump into a mound no bigger than 10-15cm.

Thyrsiflora has olive green leaves that turn a dark burgundy colour with age.

Crassula capitella is a larger plant, that can grow up to 15cm tall (and sometimes taller).
The leaves themselves are wider and more fleshy, and don't grow as compact as the thyrsiflora.


The colours of the capitella are stunning, with shades of vivid pink and red coming through with age. The colours intensify in the cooler months.


Both are geometrically amazing to look at, and look wonderful in potted succulent gardens.

31 March, 2017

Perth Garden Festival 2017


We are very excited to be attending the Perth Garden Festival again this year. Located at Mcallum Park in Victoria Park, PGF2017 will run over 4 days from Thursday 27th April to Sunday 30th April.

What's on offer?

This year, expect to see new varieties in all our ranges that are yet to be seen on our website, with bulk buy offers available. We will have cacti, lithops and larger succulents on offer, as well as a new range of miniature houses and furniture that we will be launching at the festival!


A sneak peak of the Classics that will be available at the festival.

Sun loving collectables

as well as collectables that prefer shadier positions.

Larger Succulents and Cacti will be available.

and Large Stapeliae too... This one is just about to flower!

A wide range of cacti...

and lithops too!

We will also be introducing a new range of miniature houses and cottages at the festival.

Displays!

We have been busy bees planning our display for this year, which will have a strong focus on miniature gardens. Hopefully it will provide ideas and inspiration on how to incorporate succulents, perennials and miniature gardens into your home and backyard! See photos of our under the sea display from last year!

To find out more about the Perth Garden Festival 2017, head on over to their website: perthgardenfestival.com