Showing posts with label Tutorials. Show all posts

28 June, 2023

Eclectic Gardening!


Want your eclectic streak to run wild in the garden?

Do you have a strong desire to grow all types of plants from all sorts of different origins?

You really don’t have to settle on one uniform theme for your entire garden, if you want a tropical paradise, a desert oasis and a Mediterranean cottage garden at your place, then you absolutely can! And although all three of these garden themes require different conditions – Soil, water, sunlight – You can utilise the different micro-climates that your property has to offer and even create some new ones to grow almost any plant your heart desires.    


Natural and Artificial Micro-Climates

Don’t let the climate zone you reside in dictate what plants you can work with, as you will find your property will have  a couple of different micro-climates naturally on its own:

- One area might be shady and cool thanks to large trees or buildings casting shadows.

- Another area might be protected nicely from winds by fences, walls, and trees.

- One might be suited to heat-loving plants due to masonry paving, rocks, boulders or walls.

- Slopes and hills offer a drainage difference from the top to the bottom which can be used to your advantage.

On top of that, you can create your own micro-climate to suit the plants you wish to grow:

- Planting lawn will have a cooling effect on its surrounds.

- Bodies of water can help balance out extreme weather - They can help keep an area cooler in the heat, more humid in dry conditions and warmer in frost prone areas.

- Mass planting gives individual plants a buddy or two, so they don’t have to fight those tough conditions all on their own.


Container Gardening

Pots and containers are the easiest and most efficient way to combine several themes and types of plants into your garden. Think of each pot as its own garden bed. Each container can have its own soil type and its own watering needs without having to take into consideration its neighbouring pots. Unlike a static garden bed, a pot can be moved around from season to season so it can always be in its ideal position. They come in so many styles, shapes, heights and colours, and you can bunch a group of pots together in one particular spot to create a grand, lush, eye catching display. 


Raised garden beds

Want the grand appeal of a garden but with the convenience of container gardening, then raised garden beds are the ideal choice. Let’s say you had a desire to combine cacti into your already established garden that has water hungry plants, like flowering perennials. In order to achieve this, you can simply raise a section of the garden with a prebuilt raised garden bed, or rusted metal garden edging. In this section, you can fill it with well-draining, sandy soil that cacti will love. The added height will help with the drainage, and you can easily water lower levels more often without overwatering the cacti above.


Use of props

You are by no means limited to an ordinary pot or container - You can use just about anything! An old wheelbarrow, for example, makes a great display. A couple of large boulders placed together that can retain some soil can also do the trick. A wine barrel, a retired bath tub, even an old tire can be planted into. Just make sure that holes are drilled for drainage and you are good to go. 

Adding sculptures, pillars, or any kind of garden art not only gives the space a point of interest, it can also help to retain heat during the cooler weather, or provide shade in the heat of summer. A dining chair, garden bench or small stool can be used as stands to place pots on when creating grouped container garden displays. Wooden props can be sealed to protect them from rotting, and metal props when exposed to the weather look all the more charming.


26 May, 2022

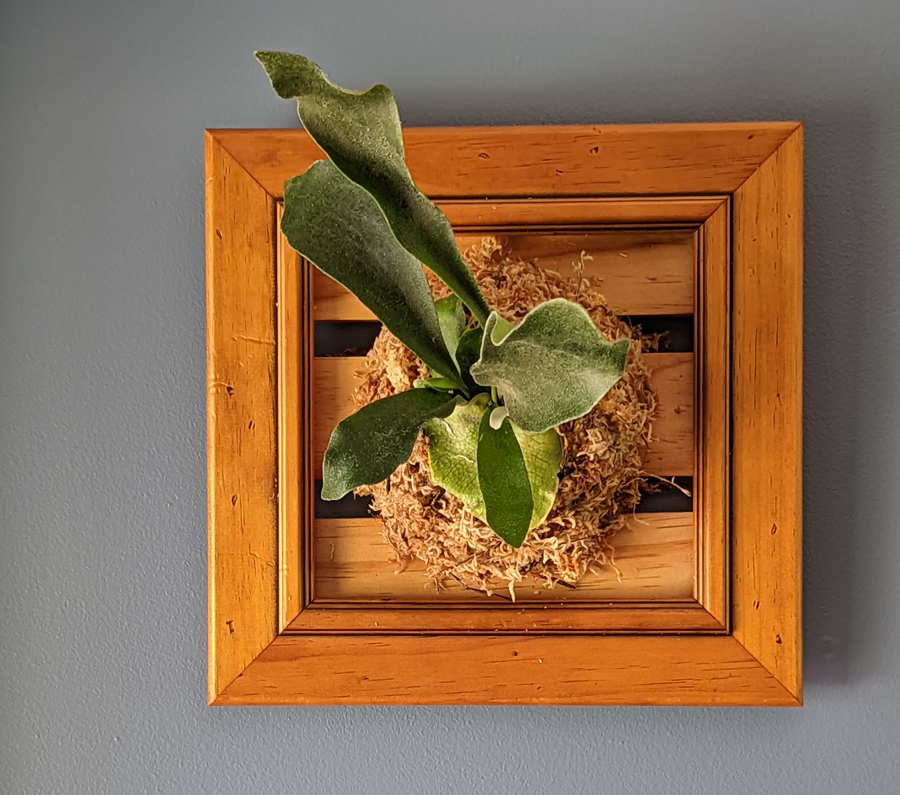
Upcycle old Picture Frames into Living Hanging ART!


Give those old picture frames a new lease on life and create a stunning living art piece for your home, garden or office. It’s the perfect project for those with limited garden space, as these art pieces hang vertically – All you need is some wall space!

It’s an easy to do weekend project for you and the family – Customizing an old picture frame takes no time at all, and the results are truly fantastic! Get the kids involved too! 


What is an Elkhorn?

Elkhorns are an epiphytic fern called Platycerium bifurcatum, and they naturally grow without soil by attaching themselves to trees, fallen logs and sometimes even rocks. It’s because of this that they make the perfect hanging vertical plants, offering architerural foliage and a burst greenery to a space.

What’s difference between an Elkhorn and a Staghorn?

Elkhorns (Platycerium bifurcatum) and Staghorns (Platycerium superbum) are both epiphytic in nature. The differences are the size of the plants, with Elkhorns having smaller, more narrow fronds. The main difference is the way it reproduces – The Elkhorn can multiply or pup quickly from ‘growing points’ on the plant. New leaves form from these growing points and soon develop into new, independent plants. With time, you can split up your Elkhorn to make more vertical frames, or leave them be for an epic mass display. The Staghorn on the other hand, reproduces from spores, and will generally remain one, albeit a lot larger, solitary plant.


Sourcing Frames

To start this project we first need to source some old picture frames. Now, you may have some lying around the house, but if not, do not fear, they are very easy to come by. Try Road side collections or Op-shops. It’s best to choose wooden frames, as we will be nailing a backing board to it (something to attach the Elkhorn to).


You will also need

- An Elkhorn plant

- Pine wood lengths

- Saw, glue and nails

- Sphagnum moss

- Fishing line


Customising the Frame

To start, we need to remove the glass, the backing and any nails or staples that are not needed. Usually the backings that come with picture frames are made of chipboard, and don’t have the strength to hold up a plant, so we will need to replace this with something stronger.

We have used pine lengths, 64mm in width. You can use hardwood, it will be more rot resistant, but you will find that most commercial wooden frames are already made of pine and are finished with a stain or varnish. We will be sealing the back of the frame to give it a longer life and have it hold up to the elements.

To create the backing board, simply cut pieces slightly shorter that the width of the frame, and attach with PVA glue and nails. Our design uses a couple of horizontal lengths of pine, with spaces in-between. These spaces will come in handy when tying the Elkhorn to the frame, and it offers a stylish look compared to a solid, one piece backing board.

Once the glue has dried, we can move on to sealing it. There are a plethora of different options and products that are available to seal raw pine. We have chosen linseed oil, as it will bring out the natural wood grain in the pine. It is also a natural product that won’t be toxic to the Elkhorn itself.


Attaching the Elkhorn

To attach the Elkhorn, we need to decide which way is up. Once an Elkhorn reaches a certain age, it will start developing a sheath. This will grow underneath the fronds and will eventually expand to envelop the plant and backing board on the frame. Identifying the sheath is simple enough – look for a flat rounded leaf growing from the base or ‘growing point’ of the plant. Spin the plant around so this sheath is at the bottom. Remove the Elkhorn from its growing pot and shake loose most of the potting mix. Try to retain a small amount of the potting mix around the root ball if you can. 


Laying the frame flat on a table, place a layer of hydrated sphagnum moss in the middle of your frame, then place the Elkhorn on top (remembering which way is up once it’s hung vertically!).  Then add more sphagnum moss around the edges to enclose the root ball and soil, being sure to leave the sheath exposed.

Using fishing line, wrap the Elkhorn (moss and all), several times around the backing board, threading the line through the gaps in the pine slats as you go. Cross over the line in different directions to make it more secure, and try to tuck the line in under sheath where you can. It does help to have an assistant at this point – If they can hold the frame and plant up from your working table, it makes it far easier to thread the line through the gaps in the frame and wrap it around the ball of moss. Once it’s sufficiently secured, you can tie off the ends of the line and trim the excess. Fishing line is very forgiving if you are not the neatest at this step - It is clear in colour, so very discreet and hidden!


Hanging

To hang the frame, we have attached some hardy string (you could use wire) with a staple gun on the back of the frame. Horticultural hooks come in handy to hang your frame from a verandah beam, or you can simply hang it just like a picture frame from a fixing on the wall.


How to care for an Elkhorn

Keep your Elkhorn in a well lit area, away from direct sunlight. You can keep them indoors, as long as the room is not too dark and the plant can receive plenty of light. It’s important that the sphagnum moss doesn’t dry out, so be sure to water them thoroughly and often to keep the moisture up to it. You can feed it during its growing season (spring to early autumn) with a diluted liquid fertilizer/seaweed solution, or with a small handful of control release fertilizer.


11 April, 2022

How much light do Succulents really need? Part 2 of 2 – Too Much Light??


How much light do succulents need? Part 2 – Is there such a thing as too much light?

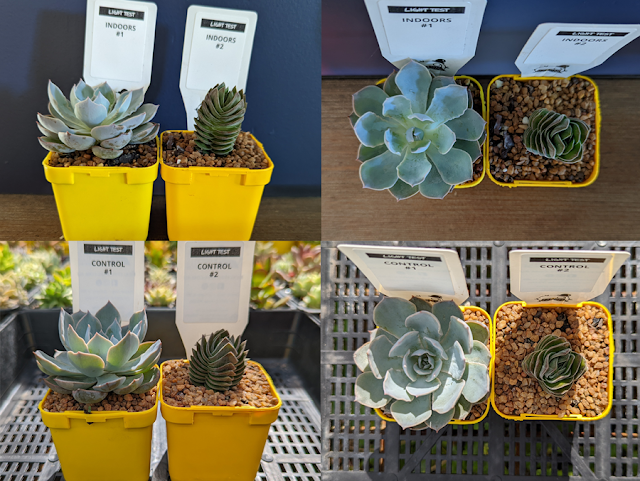
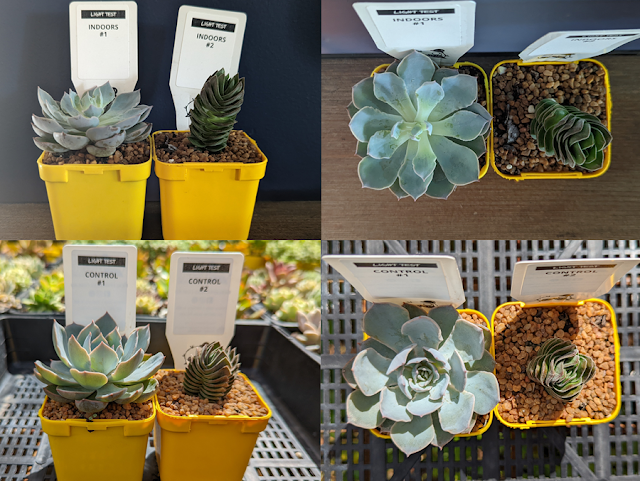
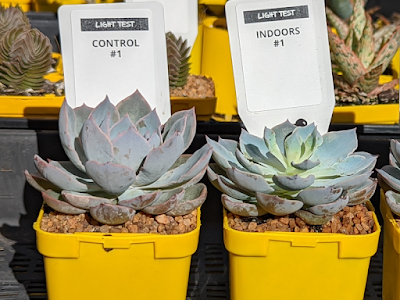
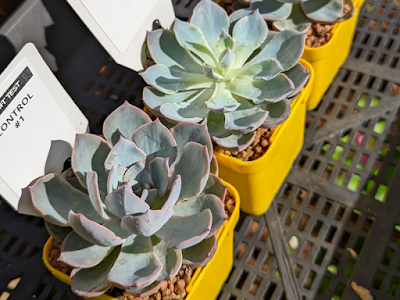
I recently conducted an experiment keeping succulents under various light conditions. 3 identical sets of plants, one set kept in a dark room, one under some artificial grow lights, and one grown as a control in the stable conditions of our succulent nursery. The purpose of the experiment was to provide some side by side photos in order to help point people in the right direction about finding the ideal spot at home to grow succulents.

In part 1 of this story, I discussed the results of the plants grown in a dark room. After 7 days, the succulents starting showing signs of lack of light and by day 12 they looked quite light deprived compared to the control plants. If you would like to view the results of that comparison, and see some tips on how to rectify the symptoms of lack of light in succulents, please head to Part 1: Signs of Lack of Light.

In part 2, I want to talk about the plants I kept under artificial grow lights. Now, I chose to add this to the experiment, because keeping succulents in an indoor location can be impractical if they don’t receive enough light in that room. By adding a grow light to your indoor succulents, you can supplement that indirect light it receives thorough a window, and you can successfully keep a nice, healthy compact plant indoors.

But for how long each day should you have this grow light on for? This is the question I wanted to answer by placing these plants under these lights. And thus, the experiment continues!

Now, if you would like to get into the science of how grow lights work, including the light spectrum, different wavelengths/colours, LED vs incandescent, it’s a big subject you can really sink your teeth into, and I do recommend delving into that rabbit hole if you have time. However for this experiment, I’m keeping it simple – I actually used an aquarium light passed on to me from my partner who really likes to keep fish. I confess, it’s a rather cheap light. I don’t have too many specs on it, only that it is 24w LED, and they are white coloured LED’s. I’ve germinated seeds under this light before and I’m very happy with the results.


THE EXPERIMENT

The Plants

Just as a reminder, the succulents I chose for this experiment were ‘Echeveria Morning Beauty’ and Crassula ‘Buddah’s Temple’. I chose the Morning Beauty because of its bright blue colour, and for its rosette shape, the Buddah’s Temple I chose because its deep green colour, and its upright growth habit.


The Conditions

All the plants were from the same batches – They were the same age, same potting media, same pot size, and had the same watering schedule up until the start of the experiment.

The control plants in this experiment were placed out in the nursery, and they received about 8 hours of sunlight per day. They were under hail net which filters out a small fraction of light. They were watered every day, as I conducted this experiment at the end of summer.

The indoor plants were kept in a room I know to be too dark to grow succulents. Although next to a window, the indirect light was just too filtered to be sufficient for healthy growth. They were watered every second or third day.

The grow light plants were placed inside a glass tank, with the LED bar light about 25cm above them. They were watered every second or third day.

I kept this light on in this tank for 24 hours a day for the duration of this experiment.

The reason why? To see whether there is such a thing as ‘too much light’.  I’ve read up on the idea of light toxicity and the detrimental effect  it can have on plants, and Kaye tells me it does exist (She is the horticulturalist in the family, who am I to disagree…) BUT, I just really wanted to see the results for myself.


THE RESULTS

Day 1


Day 3


Day 7


By day 7 there still weren’t too many differences in the plants – All 4 plants were very healthy. In fact, the Morning Beauty under the 24 hour light was doing far better than I could have expected. The foliage was strong and the rosette nice and compact. No signs of light toxicity at all.

Day 12


It was by Day 12 that I was really impressed. Both plants under the 24 hour light were absolutely thriving. The blue colour in the Morning Beauty was so intense.

Day 15 – The final Comparison


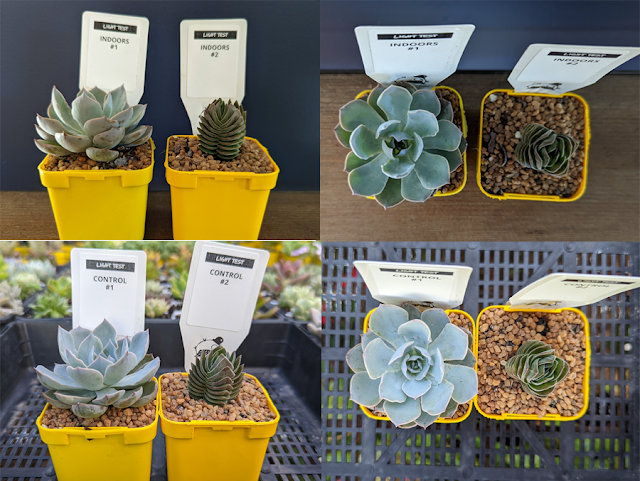
Wow. Very unexpected results. Putting all 6 plants in this experiment side by side to compare made the results very clear. No light toxicity to be seen! The intense blue colour in the Morning Beauty kept under the grow lights is just stunning. The Buddah’s Temple faired well too, however the control is just a tad more sun hardened, you can see that by the bronze colour it shows.
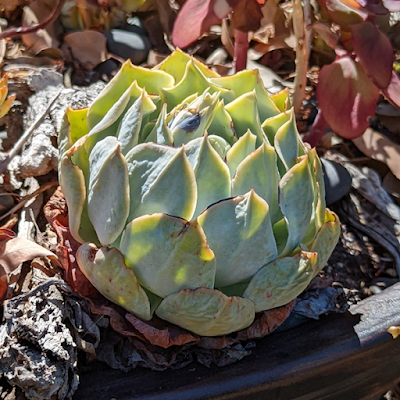
So, if you have succulents you wish to place indoors, in a spot that may be a tad too dark for healthy growth, definitely think about using a grow light. As for how long to keep the light on for each day, I would start at the basic 8 hours of light per day to mimic the sun’s behaviour. You can always increase of decrease it based on the look of your plants. Timers work great so you don’t have to remember to switch them on every day, and I like to offset the 8 hours and run my lights from noon to 8pm, so I can enjoy seeing my succulents all lit up in the evening.


Read Part 1 of this Experiment, How much light do Succulents really need? Part 1 of 2 – Lack of Light


16 March, 2022

How much light do Succulents really need? Part 1 of 2 – Lack of Light

How much light do Succulents need?

How much light do Succulents really need?

It’s a question that is asked quite often, and unfortunately, there is no universal, one size fits all answer. Succulents are a family of plants that originate from all around the globe, from all different types of environments - Tropical, Arid and even Alpine. It’s what makes them so fascinating to grow, as they offer so many different colours, textures and shapes.

The best approach in narrowing down what your succulent may need in terms of light, is to research what area it originates from, and replicating that at home. In combination with that, my best advice is to simply keep an eye on your succulent. If it is showing signs of lack of light, it’s time to make some adjustments.


What are the signs of lack of light in succulents?

To answer this question, at first I wanted to put some succulents in a dark room and take some photos after a week or two to highlight the visual signs of lack of light. Then I thought I should have some ‘control’ plants grown out in our nursery to offer as a comparison. THEN, I took it one step further and added to the experiment some plants grown under artificial grow lights, and you can read all about that in part two of this article coming up next month.


THE EXPERIMENT

The Plants

The succulents I have chosen for this experiment are ‘Echeveria Morning Beauty’ and Crassula ‘Buddah’s Temple’. I chose the Morning Beauty because of its bright blue colour, and for its rosette shape, the Buddah’s Temple I chose because its deep green colour, and its upright growth habit. 


The Conditions

All the plants are from the same batches – They are the same age, same potting media, same pot size, and have had the same watering schedule up until now.

The control plants in this experiment will be placed out in the nursery, and they receive about 8 hours of sunlight per day. They are under hail net which filters out a small fraction of light. They are watered every day, as it is the end of summer.

The indoor plants will be in my living room – A room I know to be too dark to grow succulents. Placed on a side table near a window, you may think that would be sufficient, however on the outside of the window is a rather deep undercover area. So, although there is some light coming in, it is not enough to promote healthy growth (except for my ZZ plant, which I’m pretty sure grows on magic pixy dust and not light, because it is absolutely thriving in that room!). As for watering they will be watered every second or third day, when they start looking a little dry.


THE RESULTS
Day 1

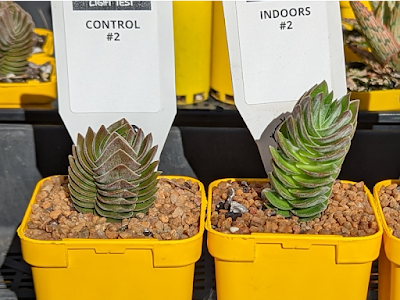
Day 1 - Lack of lIght Experiment


Day 3

Day 3 - Lack of light Experiment


Day 7

Day 7 - Lack of light Experiment


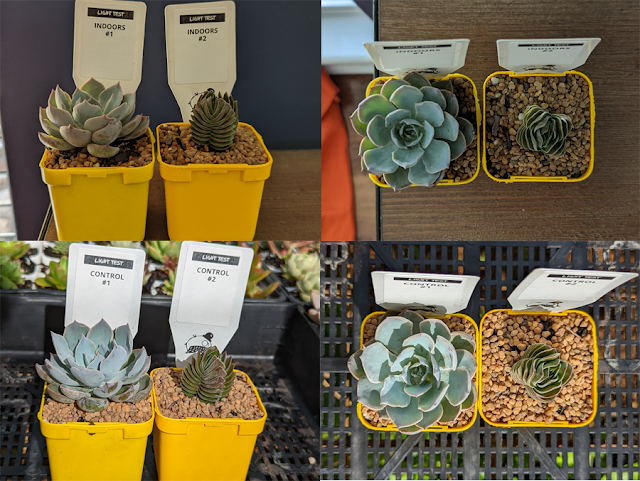
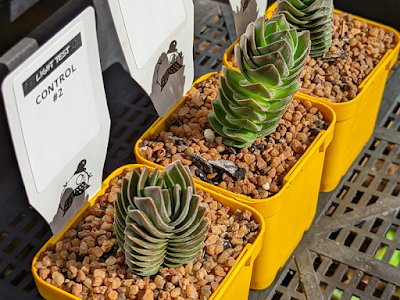
On day 7 you can see that the indoor Echeveria is starting to lose its colour towards the centre of the rosette. The Crassula is growing a little elongated as it reaches for light, and It is also starting to get a little pale in colour.


Day 12

Day 12 - Lack of light Experiment


By day 12 the Echeveria has lost more colour from the centre, and is flattening its shape compared to the control. The Crassula is much taller than the control now, and you can start to see the leaves flattening out, similar to the Echeveria.  The leaves on the control Crassula by comparison remain nice and compact.


Day 15 – The Final Comparison

Day 15 - Lack of light Experiment

Day 15 - Lack of light Experiment

Day 15 - Lack of light Experiment

Day 15 - Lack of light Experiment


As you can see, the differences are quite stark side by side on day 15, the last day of the experiment. The Crassula fared much better indoors than the Echeveria, and that’s due to its green colour which makes it more tolerant of low light conditions.


Signs of lack of light to watch out for:

Lack of colour in the foliage
Elongated growth
Flattening of rosettes or the separation of leaves
Leaves becoming soft, and sponge-like.


What can I do about it?

If you start seeing these signs in your succulents, it may be time to relocate them. You can give them the best chance to get healthy again with a few simple tips:

1. Try not to put them into a bright sunny position straight away, as this can shock them and they will go downhill quite quickly. A gradual introduction of more light is the way to go. 

2. Avoid watering too often during this period – This especially applies to rosette types, as an intake of too much water could cause them to rot.

3. Don’t fertilise a sick plant – This generally applies to most plants, not just succulents. Wait until you see some fresh healthy growth to apply a fertiliser.

4. Prune if you can – This applies to upright types, if you cut back the elongated growth, new growth will shoot away and you should start to see a nice compact plant.

5. In the case of the Echeveria, it may be too far gone to save that one rosette, BUT you may find that it will pup because it is in a stressed state. Those pups will send down roots and grow to fill up the pot space.


I hope this article points you in the right direction about finding the ideal spot in your home to grow succulents. Hopefully it will help you identify signs of lack of light, and what you can do to help them out.  In our next newsletter, we will have part 2 of this experiment, which deals with the idea of ‘too much light’, as well as growing succulents under artificial grow lights.


Read Part 2 of this experiment: How much light do succulents need? Part 2 – Is there such a thing as too much light?


01 February, 2022

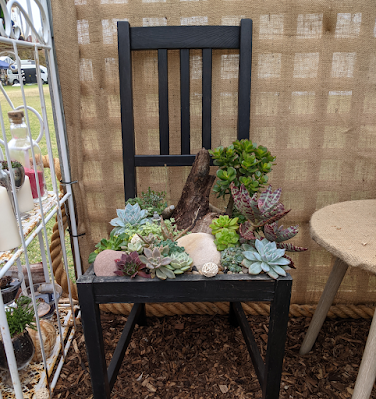
Garden ART: Old Chair to Charming Succulent Planter!

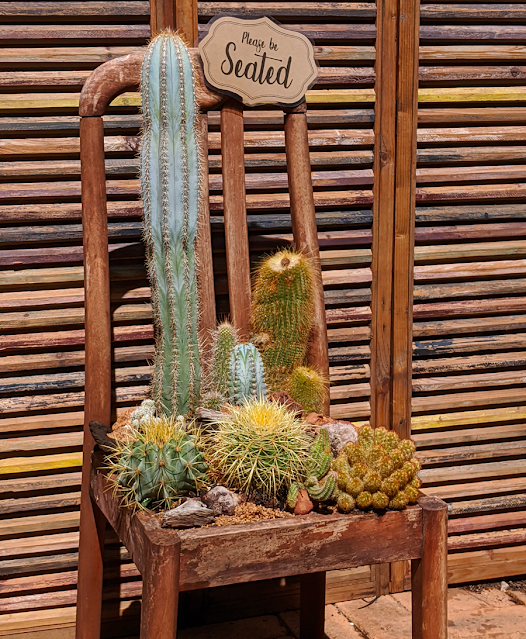
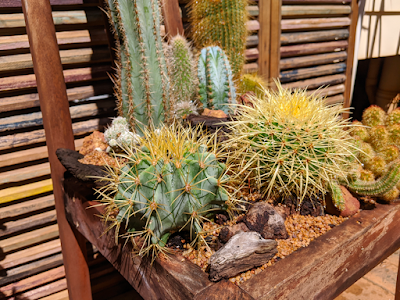
Cactus Chair

Have an old chair sitting around the house gathering dust? Well, why not UPCYCLE it into a charming succulent planter and create a unique feature for your garden that will be a talking point for all of your visitors. 

Chairs are plentiful at op-shops, recycling centres and road side collections, and they are often made of hard wood, which means a strong sturdy base that will tolerate both water and sunlight. A breezy weekend project, a succulent chair like this will look fabulous in all garden sizes, even the smallest of patio spaces.


Preparing the Chair:

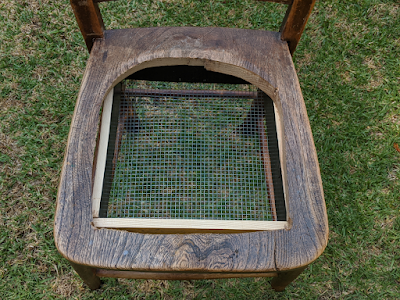
Creating a Hole – Some chairs come with a padded seat, that when removed reveal a perfect frame to plant into. Other chairs will require a hole to be cut in the seat. This extra step can be advantageous, as you can cut the hole to any size or shape – circular, square, curved at the back. Cut as much or as little of the seat away as you desire.

Building Depth – The deeper the planter box is in the chair, the more established the roots of your plants can become, extending the life of your display. And again, some chairs come with a perfect frame that’s a good 5cm – 10cm deep. But if this isn’t the case, you may need to add a wooden frame to the bottom of the seat to create some depth. If you’re not the best at DIY wood work, don’t be afraid! It doesn’t have to look super neat; you won’t see much of the frame once it is all planted up.

Succulent Chair Hole

Attaching a Bottom – We stapled wire mesh to the bottom of our seat’s frame. Mesh is ideal to use in this circumstance, as it allows water to drain freely. Don’t worry about your potting mix falling though just yet - We will cover that shortly.

Attaching mesh to the hole

Styling – You can paint your chair in a vibrant colour, or keep it natural like we have done. Shabby chic is popular right now, and is very easy to accomplish by painting on a colour and then sanding it half away. A coat of sealant will protect the wood and make it last longer, but isn’t entirely necessary if you don’t have the time.

Succulent Chair hole and frame


Planting it up:

Moss – Place a layer of sphagnum moss in the bottom of your frame. This will prevent potting mix falling through the mesh. Sphagnum Moss comes in dehydrated bricks and to prepare it, simply soak it in water for 10 to 15 minutes.

Potting Mix – Next, fill with a good quality, free draining cacti and succulent potting mix. Use large natural objects like rocks, logs or drift wood to create height in your base, and then fill in the spaces between with your mix.

Plants – Start by planting the largest feature plants first and work your way down to the small fillers. Combine succulents with similar colours and shapes for a classic, sophisticated design, or play with different colour and shape combinations for a more eclectic look. We have planted ours out entirely with Cacti – Taller ones at the back and squattier ones at the front. We also used a small log as a retaining wall in the middle to give the back section more height.

Cactus Chair

Mulch - Once you are happy with the design, water in the plants before applying a topping of gravel or small pebbles. A topping like this helps insulate the roots from intense heat or cold and prevents the mix from drying out and becoming water repellent. It is also helpful in securing plants into place, and preventing soil erosion. Water thoroughly a second time to allow the gravel to settle.

Succulent Chair


Maintenance:

Sun - Keep your chair in a nice, bright spot. Avoid direct sunlight in the afternoon and on days where the temperature is over 38 degrees. 

Succulent Chair

Water - Water thoroughly every couple of days when the weather is mild. Water more often in the hotter months and cut right back during winter.

Pruning and Fertiliser - Prune the foliage every so often to keep the plants nice and compact, and remove any dead foliage. Fertilise with a control release fertiliser as directed.

Cactus Chair - PGF2021

This is our cactus chair as part of our SPELLBOUND display at the Perth Garden Festival 2021. The sign reads: "Complaints department - Please take a seat..."


18 January, 2022

Succulent in Heatwaves - Top Questions Answered


It seems that summer has now officially arrived, albeit a little late to the party.

The mild start to the season was a delightful treat to everyone and their plants. Then, it seemed without notice, we were blasted into the high 30's and low 40's before we knew it - A lovely Christmas present to us all.

Up in the hills here, we actually lost power for two days over Christmas. This meant our reticulation system was out for the count and we were forced to halt the celebrations to hand water our plants. Oh, the sacrifices we make for the plants!

How did your succulents fair in the heat wave? Are you prepared for the next one?

As we head into the second month of summer (and it seems like the hot weather is here to stay), we thought we would answer some frequently asked questions we are receiving lately about caring for succulents in the heat.


How often should I water during Summer?

One old fashioned rule is to 'water when the soil or mix becomes dry'. I'm not the biggest fan of this rule, as you don't actually want the soil or mix to completely dry out - This will make it become water repellant. When you do get around to watering, the water will sit on top of the soil/mix for a second or two, and then run off to the side, away from the base and roots of the plant. 

If this is the case with your mix, don't fret, it can be corrected - You can use a soil wetting agent to improve water penetration. They come in liquid form and a granular form ( I prefer the granules, you can sprinkle over as needed with ease).

A more modern take on this watering guidline is 'Water when the soil or mix is NEARLY dry'. A little less than damp. But how often is that?

Well, it does depend on a bunch of different factors - Plants inside will need watering less often, as will those in shadier positions in the garden. On the other hand, those plants in pots (especially smaller ones) could be watered once a day in the summer months, as could plants in sunnier positions. Learn to listen to your plants, and look for the signs of dehydration - Wilted or sagging leaves, rosettes shrinking and closing up, loss of colour and brown leaves.

An Echeveria 'Domingo' with heat stress.

An Echeveria 'Domingo' showing signs of heat stress - the rosette has closed up and the leaves are wrinkled and turning brown.

Aloe striata showing heat stress

An Aloe striata in the garden that is suffering in the heat. The rosette has closed up and the leaves are browning and curling.


How can I stop leaves from burning?

There are a few temporary measures you can take to help protect your succulents from burning in the sun if you know the temperature is going to go up past, say, 38 (ish) degrees.

The first is temporary relocation - If your plants are in pots, and you are able to move them, the best option is to place them somewhere for the day, or a couple of days, where the sunlight isn't shining directly on them. Under a verandah or patio is perfect. Ideally, somewhere where they can still receive plenty of indirect sunlight.

The second option is a temporary shade sail, such as shade cloth. The key to creating a great temporary shade sail is airflow. Lift the shade cloth up with stakes as much as you can and avoid having the shade cloth touching the foliage. If it's quite low to the ground, it can create an environment too humid for succulents.

After a couple of days of being under shade cloth, your succulents can start to become leggy and green, so it's not really an ideal situation for the whole summer season, but the perfect temporary solution for those extreme days.


When should I water my succulents?

If possible, try to water your succulents in the cooler times of the day - Either early in the morning or late afternoon. The reason for this is that it can be the combination of water and heat that causes rot in your plants. Sometimes the water can pool on the foliage, especially in the case of rosette type succulents. This pooling creates a 'magnifying glass effect' with the sunlight, which can cause sun damage.

Remember to water succulents thoroughly, so they can develop a lovely strong, deep, root system. This gives them the best chance to defend themselves against the heat.


For the most part, succulents are very water wise, and generally very tolerant of the heat. But during those times where temperatures start getting above 36/38, and especially for an extended period of time, we need to provide them with just a little more TLC so they can get through the season.

05 June, 2019

Keeping Succulents Indoors - A How-to Guide


Choosing Plants:
Opt for succulents that can tolerate low light conditions. Green coloured succulents tend to be low-light tolerant, and are more successfully grown indoors. Succulents with bold, bright colours tend to require more light than an indoor position can offer. These succulents are better suited to outdoor applications in a full sun/part shade aspect.

Haworthia and Gasteria species make fabulous indoor succulents, and then there’s the old classic Mother-in-Law's Tongue, or Sansevieria (pictured), that is an almost indestructible indoor plant.

Choose trailing succulents for indoor hanging baskets or macramé hangers – Succulents like String of Pearls (Senecio rowleyanus), String of Beans (Senecio herreanus) and Rhipsalis species are the perfect choice for indoor hangers.

Browse for low-light tolerant plants in our online store - Fickle Prickles.


Potting Mix:

Always plant succulents into a good quality, cacti and succulent potting mix. Simply put, cacti and succulent potting mix is more ‘free draining’ than regular potting mix, and this helps to keep your succulent’s roots from rotting.

To further improve the drainage of your mix, you can add perlite at a ratio of 1 part perlite to 4 parts succulent mix.


Containers:

Pots with drainage holes are best. If they have saucers, that is perfectly fine, just be sure to empty them after each watering. Succulents don’t like having wet feet for extended periods of time.
If you have containers without drainage, including glassware, there are two potting methods you can try:

1. Expanded clay


Expanded clay is available at some nurseries and most hydroponic retailers. To use it, simply rinse to clean and fill up your desired container. Put a small piece of charcoal in the bottom to filter the water. Rinse your plants of any soil and plant into the expanded clay. Read more about Potting Succulents into Glassware using Expanded Clay on Succulent ART's website.


2. The Charcoal Method


This method works for both terrariums as well as any container in general that lacks drainage. It involves layering a container firstly with charcoal, then sphagnum moss, and then cacti and succulent potting mix. The moss prevents the potting mix falling into the charcoal layer, and the charcoal layer helps keep the water clean. Read more about Potting Succulents into Containers without Drainage on Succulent ART's website.

There’s also the ‘pot cover’ technique, where you keep your succulent planted in its plastic pot, and you then place that inside a decorative pot cover that has no holes. This allows you to take the plant out of its cover every time it needs watering. Very handy.


Light:

Certain plants require more light than others. Some need to be near a window with a significant amount of light, some need to be near a window but will require less light, and some (such as Sansevieria) can tolerate being in the centre of a room with a little amount of light.

The general rule of thumb for succulents is 6 hours of indirect sunlight per day. Remember the sun sits higher in the sky during summer, and lower in the sky during winter, so what may work perfectly in one season, may not in the next. Play around with positions until you find what works best for your succulent.


Water:

1. For containers with drainage holes – Firstly, be sure to water them thoroughly; that is, until the water falls freely out of the bottom. After this, allow time for the water to drain and then put your plant back into place. Try to avoid having water sitting in a saucer by emptying them regularly.

Secondly, allow the mix to almost dry out before the next watering. I’d love to give you a specific schedule, but it is really dependant on the plant and its position. Once a week is a good starting point. More often in Summer, less often in Winter. Remember the rule –Water more, less frequently.

2. For containers without drainage holes - If you are using the expanded clay method mentioned above, keep the water level to no more than one third the way up the container. For the charcoal method, keep the water level to below the moss layer. This will still allow the roots (though capillary action) to receive water without them actually sitting in any water.


Fertiliser:

Use a control release fertiliser once a year, preferably in spring, just before their main growing season. You can also use liquid fertilisers, but dilute the solution to approx half strength.


Learn to listen to your plants:


  • If they are losing their colour and turning dark green, they may need more light.
  • If they are shrivelling and wrinkling, they may need more water.
  • If they are softening and going squishy, they may need less water.
  • If they are growing elongated, they may be reaching for the light. Prune them and place in a brighter spot.
  • Dropping leaves – All succulents lose leaves during their growth cycle. Dead leaves don’t necessarily mean a sickly plant. A healthy succulent will tend to drop its lower leaves, and grow new leaves from the top/centre.


Have fun and experiment!

The great thing about succulents is their ability to ‘hang in there’ until you have time to care for them. You can, in most cases, bring a succulent back to health that is looking worse for wear, giving you the perfect chance to experiment and learn what works and what doesn’t in your particular situation.

Don’t let them get you down if they don’t make it! Temporary plant displays are just as fantastic as long term ones, and will probably cost you less to setup that most cut flower arrangements.
So get to it! Plant up your living room, kitchen, or office and increase your plant/life balance!

05 September, 2018

How to revamp your potted succulents this spring


Spring is here!
Now that the warm weather is on its way, our succulents will be waking up from their sleepy winter and starting to grow. Spring is the start of their prime growing season (well, most species anyway) and is the perfect time to give some attention to those sad looking succulent pots.

Now is the time to weed - Don't sigh, you know it's time... Pull out all those bubba weeds that have shot up. Do it now, before those pots become more weed than succulent. Your plants will thank you for it.

Tidy up - Remove any dead or rotting leaves. This is especially true for your rosette types (Sempervivum/Echeveria) that grow from the centre out and have old, rotting leaves on the outside and underneath the rosette. It's important to remove these to promote new growth and ensure the rot wont spread to the main plant.

Re-pot if necessary - Spring is the perfect time to re-pot those succulents that have been sitting in the same potting mix for several years, or those who's potting mix has collapsed to well below the lip of the pot. Applying a fresh mix is a great way to give your plants a new lease at life, you will be providing them with an abundant source of nutrients, and it will also help with the drainage of your potted succulent, as that old mix has probably become a little water repellent over time.

Now is the time to fertilise - Speaking of nutrients, now is the perfect time to re-apply that control release fertiliser. You can also apply a seaweed or blood and bone solution to give your plants a kick start to spring.

Mulch - Mulch isn't just for the garden. Potted succulents will benefit just as much from a good layer of gravel. Not only does it make the plant 'pop' and look absolutely stunning, it also helps prevent water evaporation from the soil. It provides the roots insulation from the suns rays, which is vital in WA's intense summer heat.

Sun - Spring is the main growing season for most succulents. So make the most of it! Make sure your potted plants are receiving a decent amount of sunshine. Place them in a well lit area and they will burst into life.

06 July, 2018

Succulents and Frosts


We are very fortunate here in Perth to not experience frequent frosts during winter. But that doesn't mean they can't happen - This photo above was taken in July 2015 when the temperatures dipped to below freezing just after the sun rose. It was only for a very short period of time, and it only dipped a little below 0, but still, you can see the effect it had on my poor oregano plant!

Very pretty, but also pretty devastating if you have succulents. Why is that? Succulents retain water in their foliage, which is what gives them their fleshy look. This is what freezes when the temperatures dip. Some succulents are more prone than others - The more 'fleshy' the foliage, the more susceptible they are. Species of Sempervivum, for example, have thinner, tougher leaves. They originate from Alpine regions and can tolerate frosts easier than say, species of Echeveria, with their juicy, plump foliage.

How can you protect your succulents from frost damage?

It is relatively easy to protect your succulent babies from being damaged by frosts, all it takes is a little planning and forward thinking. Like I said, we are lucky to not have below freezing temperatures for very long, and at worse, we generally only see temperatures of -1 or -2, so little changes can make a big difference.

Succulents in Pots:

Pick them up off the ground. Frosts tend to rise from the ground no more than say half a meter, so simply by placing your pots on a table or plant stand, you may have done enough to protect them already.

Minimise their exposure. This can be done by placing them under a verandah or patio instead of outside in the elements. Placing your pots near the walls of your house is also great.

Insulation. Mulch your pots with pebbles and/or gravel. Whilst it may seem like this will only protect the soil and roots of your succulent and not the foliage, stones will retain heat from the day longer than just bare soil. Having your foliage in close proximity to this 'insulation' will help prevent the immediate air around your pot plant from dipping that one degree below zero and generating icicles on your foliage.

Succulents in the Garden:

Gardens are a little trickier to protect, as you cant just 'relocate' them until the weather improves like you can with pots. However the same sort of principles do apply.

Mulch your gardens. As mentioned above, mulching will help keep the immediate air around your plants that little bit warmer than just bare soil.

Plant in mass. A singular plant on its own is exposed in all directions to the cold. Plant in mass and they will create a little eco-system of their own and help keep each other warm. Like you see the penguins do when a blizzard comes!

Use masonry in your landscape design. Sculptures, statues and even large rocks are all perfect at absorbing the sun during the day and cooling down slowly at night. Plant your more susceptible species near these features and it will provide them with protection from the cold.

I hope these tips help you protect your succulent collection from the frosts this winter and get them through to the warmer weather in spring.


25 January, 2018

4 more DIY succulent valentine ideas!


Skip the chocolates this year, and those expensive flower arrangements that only last a week - Give your Valentine a special gift that will last! We have found 4 really simple, yet incredibly adorable Valentine's gift tutorials that your special someone will love!


Punnerific Pot
Found on Pinterest

Jazz up a terracotta pot with some paint, wind some jute around the lip of the pot and don't forget to include your favorite succulent pun. This one says "You had me at aloe", but some of my other favorite succulent themed puns include:
" I ALOE you VERA much"
"My life would SUCC without you" 
and "I'm so glad I pricked you" 

Plant a succulent of your choosing and you have one punnerific valentine's gift.


Succulent Book Planter
Found on Pinterest

I love this idea - so simple, yet really dramatic. I think the hardest part would be picking a book you are willing to drill a hole into (I suggest heading towards the tax law section of your local second hand book store). 

What's great about these is that they are more than just a temporary display. If you can drill the hole in your book stack the same size as your potted succulent, you can simply place your plant (pot and all) in there and remove when it needs watering. Wait until the water drains out the pot, and back into the book he goes. Brilliant! It could last for years to come! A perfect gift for succulent lovers of all types.


Succulent Dinosaur Planter

A quirky gift for that someone special in your life on Valentine's day. These guys are easier to make than you think, all you need is some sharp scissors or tin snips to cut a hole in a plastic dinosaur. Poke a hole or two in the bottom for drainage and plant away! I personally would love to see these with a cactus or two in them. You can leave the dinosaurs Au Naturel, or paint in funky colours - flouros, metallics, any colour that takes your fancy!


Succulent Miniature Garden
Found on Pinterest

Miniature gardens or fairy gardens don't have to be a grand affair. A simple pot with 2 or 3 succulents and 1 or 2 miniature accessories make a gorgeous display, and a great gift for Valentines Day.

Pick accessories that match in size and theme and you can't go wrong. I do recommend planting into a container with a drainage hole, so the garden can live on well into the future. See our range of Miniature Garden Accessories on our website.

So there you have it, 4 more ideas to DIY your way into any succulent lovers heart this Valentines Day. Be sure to check out our Valentine's article form last year - 4 Delightful DIY Succulent Valentine ideas - for more gift ideas and tutorials.

08 January, 2018

Succulents in Summer - Tips on how to get your succulents through scorching temperatures

Succulents in Summer - Tips and tricks

As we delve deeper into the Summer months, scorching temperatures are yet again rearing their ugly heads. Perth is renowned for its intensely hot sun, and our recent maximums of  high 30's are only a sign of things to come.

Succulents are, in a way, incredibly drought and heat tolerant. However, they aren't completely immune to burning and stress if they are exposed to extended periods of direct sunlight. This is particularly true of freshly planted succulents whose roots are yet to establish.

However, there is hope! There are a few tricks and techniques that can help get succulents through summer's scorching temperatures.

Protection from the sun: 

If your succulents are receiving direct sunlight for more than even a few hours each day during summer, their foliage may burn. Older, more established plants may be able to hack the pace, but younger plants will need a little protection during this time.

Option 1: Relocation. If your succulents are in pots that are small enough to move, than I would highly recommend temporarily relocating them to a part shade position, such as under a verandah or patio. This is just for the time being, and they can be happily moved back out into a full sun position after the sun starts to calm down later in the season. Be sure that they can still receive plenty of indirect sunlight during this time.

Option 2: Shade Cloth. If your plants are too big to move, or planted into the garden, you can create a little sun shade for them, using a small piece of shade cloth and a few bamboo stakes. It doesn't have to look grand, it just has to temporarily provide protection from the sun. This trick is especially helpful to newly planted succulents, as they may not have had the time to acclimatise to their new environment. Be sure to use 50% shade cloth and not 80%, so the plant can receive enough light.


Watering:

1. Water Thoroughly. Even though succulents are incredibly water wise, it is always a good idea to water them thoroughly until the water drains through the bottom of the pot. If in the garden, water deeply into the soil, so that the entire root system is sufficiently wet. The reason we do this is because a root system will only develop within reach of its water supply. If only the top soil is wet (which is what happens with a sprinkling of water) then the root system will remain small and shallow. This will greatly diminish the plant's defence against the heat, and before long you will start to notice a sickly looking plant.

2. Water during cooler times of the day. If at all possible, water your succulents in the early morning or the late afternoon. Avoid watering during the peak of the day, as the combination of heat and water can cause some succulents to rot. Rosette type succulents in particular will thank you for an early or late drink, as the water can pool in the middle of the rosette and act as a magnifying glass for the sunlight, burning the centre foliage of the rosette.


Soil Condition:

Check to see that when you water your succulents, the water is getting to the roots of your plant and not just sitting on top of the soil. Check not only succulents in the garden but also those in pots, as sometimes the water can run down the inside of the pot and not get into the actual root ball.

If you find this is the case, simply apply a soil wetting agent as directed and you will see the results immediately. Some dire cases may need re-potting, or topping up with fresh potting mix. You can apply a soil wetting agent to your containers and gardens a couple of times over the hot summer. The difference will amaze you. The plants will cope a lot better if they are getting sufficient water.


Mulch:

Mulching your succulents will help keep the evaporation rate of your soil to a minimum. Soil will dry out a lot quicker if it is exposed to sunlight. This principle applies to both succulents in the garden, as well as to those in pots. Wood chips, gravel and pebbles all make excellent mulches, and they can also liven up the look of your plants too, with many different coloured mulches now available on the market.


By following these simple tips and tricks, your succulents will be a little happier over these drearily hot months and continue to grow and thrive long into the New Year.

04 December, 2017

5 Succulent Christmas Ideas!


Stuck for inspiration on what Christmas decorations to include around your house this year? What about including succulents?! Here are some wonderful ideas on how to incorporate succulents onto your Christmas table:


Create a Living Succulent Christmas Tree Tutorial
by Maya Marin (eHow)

I've thought about making a succulent tree before using a cone shaped florist block, but this is so much better! By using chicken wire and sphagnum moss, this tree will not only look pretty just for the holidays, but with some occasional maintenance can last for months and months afterwards!

A little tip I have picked up that could be useful here is that I have never once used pre-made floristry pins. I find bending a bit of wire in half works just as well, and a roll of wire purchased from your local hardware store can make hundreds of pins, saving you a little bit money.

I really like the idea of incorporating the odd bunch of plastic red berries here and there. You know the ones, you can get them from pretty much any store selling Christmas decorations. Not expensive at all, and it will give your tree just that touch of red among the green shades of the succulents.

From Pinterest

I just love succulents mixed with candles. This is a great idea for a large Christmas table. A centre piece like this could be made from an inexpensive wooden box found at a discount store. Jazz it up with watered down white or light blue paint for that antique look.

This could be a temporary display, made up with sphagnum moss and succulent cuttings, or for a more permanent display, you could drill holes in the bottom and plant established succulents with a cacti and succulent potting mix. I would recommend lining the wood with plastic and poking holes into that as well. This just protects the wood from rotting, whilst still letting the water drain away.


From Pinterest
Speaking of Christmas table centre pieces, This succulent wreath with a candle in the middle would look very festive for Christmas lunch or dinner. What a brilliant idea, incorporating a string of battery operated led fairy lights for that touch of drama. Learn How to make a succulent wreath.


From Pinterest
Individual gifts that also serve as placeholders for the Christmas table? Yes, please! Who could resist a little keep sake they can take home after eating all that Christmas pudding. You can buy all sorts of pretty card at any craft shop these days, and with a nice pen you can write names onto them (or if you're like me and possess absolutely no calligraphy skills, you can cheat and use your printer :P ). Glue onto a bamboo skewer and spike into the succulent pot, or simply attach the placeholder card with a ribbon tied around the pot.


DIY | glitter succulent planters by Lolly Jane
A great way to pimp up a humble terracotta pot. Some paint, decoupage glue and glitter is all you need to make these fabulous succulent Christmas gifts. Full instructions can be found on Lolly Jane's Website.

I hope that provides you with a little inspiration on how to incorporate succulents into your Christmas decorating this holiday season. For more inspiration and ideas on Christmas succulent projects, check out our Pinterest board - Succulent Christmas Ideas. If you have any succulent Christmas ideas or projects you would like to share, please comment below!