Showing posts with label Care Info. Show all posts

11 April, 2022

How much light do Succulents really need? Part 2 of 2 – Too Much Light??


How much light do succulents need? Part 2 – Is there such a thing as too much light?

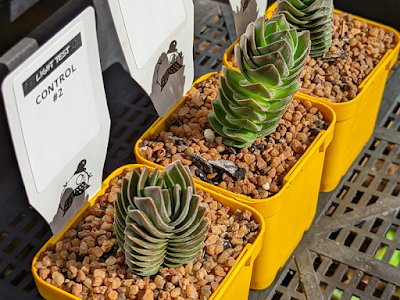
I recently conducted an experiment keeping succulents under various light conditions. 3 identical sets of plants, one set kept in a dark room, one under some artificial grow lights, and one grown as a control in the stable conditions of our succulent nursery. The purpose of the experiment was to provide some side by side photos in order to help point people in the right direction about finding the ideal spot at home to grow succulents.

In part 1 of this story, I discussed the results of the plants grown in a dark room. After 7 days, the succulents starting showing signs of lack of light and by day 12 they looked quite light deprived compared to the control plants. If you would like to view the results of that comparison, and see some tips on how to rectify the symptoms of lack of light in succulents, please head to Part 1: Signs of Lack of Light.

In part 2, I want to talk about the plants I kept under artificial grow lights. Now, I chose to add this to the experiment, because keeping succulents in an indoor location can be impractical if they don’t receive enough light in that room. By adding a grow light to your indoor succulents, you can supplement that indirect light it receives thorough a window, and you can successfully keep a nice, healthy compact plant indoors.

But for how long each day should you have this grow light on for? This is the question I wanted to answer by placing these plants under these lights. And thus, the experiment continues!

Now, if you would like to get into the science of how grow lights work, including the light spectrum, different wavelengths/colours, LED vs incandescent, it’s a big subject you can really sink your teeth into, and I do recommend delving into that rabbit hole if you have time. However for this experiment, I’m keeping it simple – I actually used an aquarium light passed on to me from my partner who really likes to keep fish. I confess, it’s a rather cheap light. I don’t have too many specs on it, only that it is 24w LED, and they are white coloured LED’s. I’ve germinated seeds under this light before and I’m very happy with the results.


THE EXPERIMENT

The Plants

Just as a reminder, the succulents I chose for this experiment were ‘Echeveria Morning Beauty’ and Crassula ‘Buddah’s Temple’. I chose the Morning Beauty because of its bright blue colour, and for its rosette shape, the Buddah’s Temple I chose because its deep green colour, and its upright growth habit.


The Conditions

All the plants were from the same batches – They were the same age, same potting media, same pot size, and had the same watering schedule up until the start of the experiment.

The control plants in this experiment were placed out in the nursery, and they received about 8 hours of sunlight per day. They were under hail net which filters out a small fraction of light. They were watered every day, as I conducted this experiment at the end of summer.

The indoor plants were kept in a room I know to be too dark to grow succulents. Although next to a window, the indirect light was just too filtered to be sufficient for healthy growth. They were watered every second or third day.

The grow light plants were placed inside a glass tank, with the LED bar light about 25cm above them. They were watered every second or third day.

I kept this light on in this tank for 24 hours a day for the duration of this experiment.

The reason why? To see whether there is such a thing as ‘too much light’.  I’ve read up on the idea of light toxicity and the detrimental effect  it can have on plants, and Kaye tells me it does exist (She is the horticulturalist in the family, who am I to disagree…) BUT, I just really wanted to see the results for myself.


THE RESULTS

Day 1


Day 3


Day 7


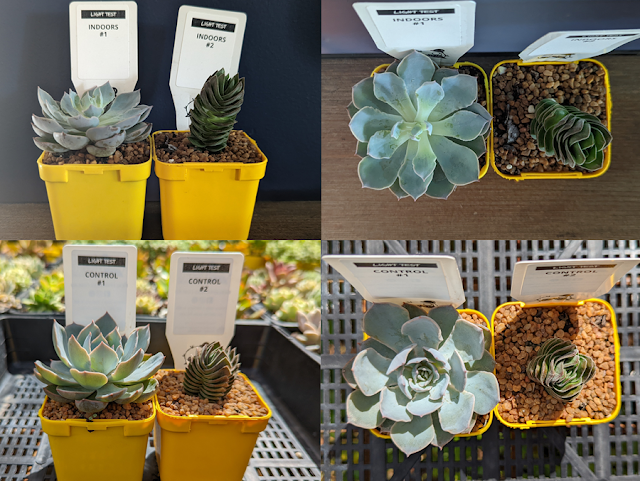
By day 7 there still weren’t too many differences in the plants – All 4 plants were very healthy. In fact, the Morning Beauty under the 24 hour light was doing far better than I could have expected. The foliage was strong and the rosette nice and compact. No signs of light toxicity at all.

Day 12


It was by Day 12 that I was really impressed. Both plants under the 24 hour light were absolutely thriving. The blue colour in the Morning Beauty was so intense.

Day 15 – The final Comparison


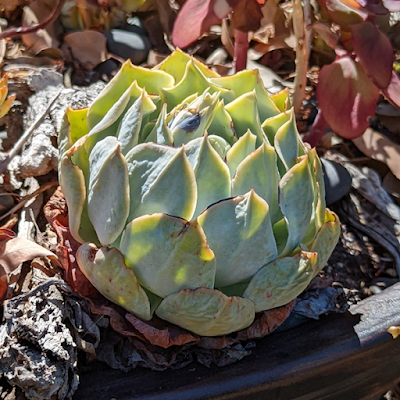
Wow. Very unexpected results. Putting all 6 plants in this experiment side by side to compare made the results very clear. No light toxicity to be seen! The intense blue colour in the Morning Beauty kept under the grow lights is just stunning. The Buddah’s Temple faired well too, however the control is just a tad more sun hardened, you can see that by the bronze colour it shows.

So, if you have succulents you wish to place indoors, in a spot that may be a tad too dark for healthy growth, definitely think about using a grow light. As for how long to keep the light on for each day, I would start at the basic 8 hours of light per day to mimic the sun’s behaviour. You can always increase of decrease it based on the look of your plants. Timers work great so you don’t have to remember to switch them on every day, and I like to offset the 8 hours and run my lights from noon to 8pm, so I can enjoy seeing my succulents all lit up in the evening.


Read Part 1 of this Experiment, How much light do Succulents really need? Part 1 of 2 – Lack of Light


16 March, 2022

How much light do Succulents really need? Part 1 of 2 – Lack of Light

How much light do Succulents need?

How much light do Succulents really need?

It’s a question that is asked quite often, and unfortunately, there is no universal, one size fits all answer. Succulents are a family of plants that originate from all around the globe, from all different types of environments - Tropical, Arid and even Alpine. It’s what makes them so fascinating to grow, as they offer so many different colours, textures and shapes.

The best approach in narrowing down what your succulent may need in terms of light, is to research what area it originates from, and replicating that at home. In combination with that, my best advice is to simply keep an eye on your succulent. If it is showing signs of lack of light, it’s time to make some adjustments.


What are the signs of lack of light in succulents?

To answer this question, at first I wanted to put some succulents in a dark room and take some photos after a week or two to highlight the visual signs of lack of light. Then I thought I should have some ‘control’ plants grown out in our nursery to offer as a comparison. THEN, I took it one step further and added to the experiment some plants grown under artificial grow lights, and you can read all about that in part two of this article coming up next month.


THE EXPERIMENT

The Plants

The succulents I have chosen for this experiment are ‘Echeveria Morning Beauty’ and Crassula ‘Buddah’s Temple’. I chose the Morning Beauty because of its bright blue colour, and for its rosette shape, the Buddah’s Temple I chose because its deep green colour, and its upright growth habit. 


The Conditions

All the plants are from the same batches – They are the same age, same potting media, same pot size, and have had the same watering schedule up until now.

The control plants in this experiment will be placed out in the nursery, and they receive about 8 hours of sunlight per day. They are under hail net which filters out a small fraction of light. They are watered every day, as it is the end of summer.

The indoor plants will be in my living room – A room I know to be too dark to grow succulents. Placed on a side table near a window, you may think that would be sufficient, however on the outside of the window is a rather deep undercover area. So, although there is some light coming in, it is not enough to promote healthy growth (except for my ZZ plant, which I’m pretty sure grows on magic pixy dust and not light, because it is absolutely thriving in that room!). As for watering they will be watered every second or third day, when they start looking a little dry.


THE RESULTS
Day 1

Day 1 - Lack of lIght Experiment


Day 3

Day 3 - Lack of light Experiment


Day 7

Day 7 - Lack of light Experiment


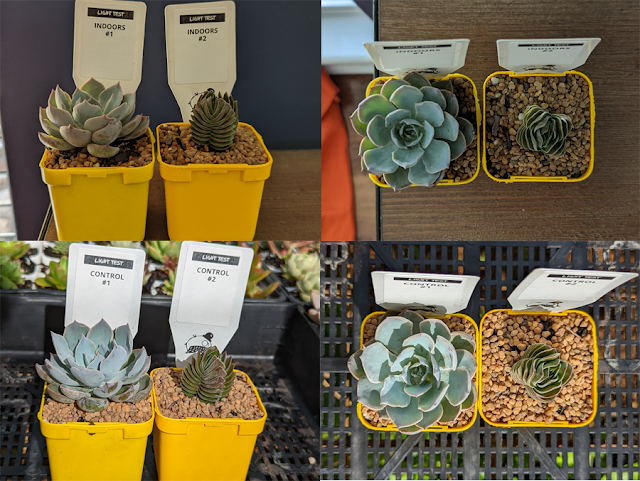
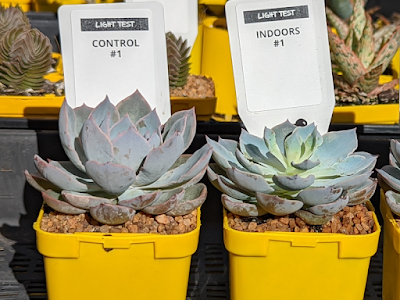
On day 7 you can see that the indoor Echeveria is starting to lose its colour towards the centre of the rosette. The Crassula is growing a little elongated as it reaches for light, and It is also starting to get a little pale in colour.


Day 12

Day 12 - Lack of light Experiment


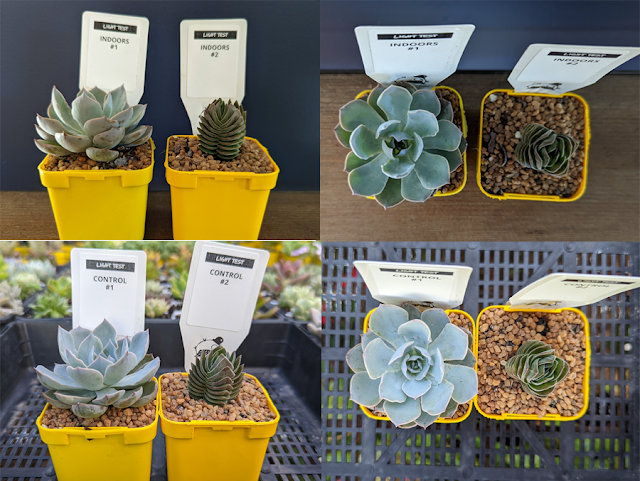
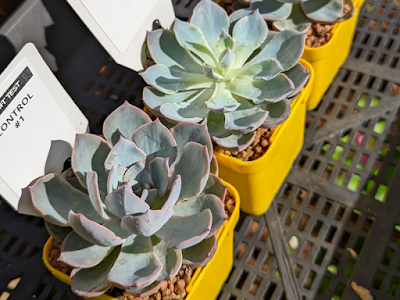
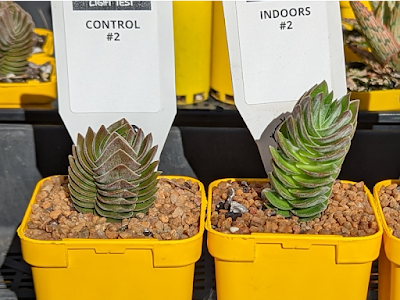
By day 12 the Echeveria has lost more colour from the centre, and is flattening its shape compared to the control. The Crassula is much taller than the control now, and you can start to see the leaves flattening out, similar to the Echeveria.  The leaves on the control Crassula by comparison remain nice and compact.


Day 15 – The Final Comparison

Day 15 - Lack of light Experiment

Day 15 - Lack of light Experiment

Day 15 - Lack of light Experiment

Day 15 - Lack of light Experiment


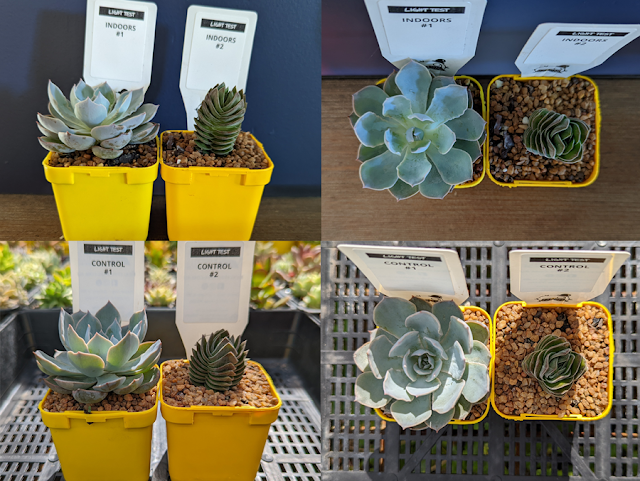
As you can see, the differences are quite stark side by side on day 15, the last day of the experiment. The Crassula fared much better indoors than the Echeveria, and that’s due to its green colour which makes it more tolerant of low light conditions.


Signs of lack of light to watch out for:

Lack of colour in the foliage
Elongated growth
Flattening of rosettes or the separation of leaves
Leaves becoming soft, and sponge-like.


What can I do about it?

If you start seeing these signs in your succulents, it may be time to relocate them. You can give them the best chance to get healthy again with a few simple tips:

1. Try not to put them into a bright sunny position straight away, as this can shock them and they will go downhill quite quickly. A gradual introduction of more light is the way to go. 

2. Avoid watering too often during this period – This especially applies to rosette types, as an intake of too much water could cause them to rot.

3. Don’t fertilise a sick plant – This generally applies to most plants, not just succulents. Wait until you see some fresh healthy growth to apply a fertiliser.

4. Prune if you can – This applies to upright types, if you cut back the elongated growth, new growth will shoot away and you should start to see a nice compact plant.

5. In the case of the Echeveria, it may be too far gone to save that one rosette, BUT you may find that it will pup because it is in a stressed state. Those pups will send down roots and grow to fill up the pot space.


I hope this article points you in the right direction about finding the ideal spot in your home to grow succulents. Hopefully it will help you identify signs of lack of light, and what you can do to help them out.  In our next newsletter, we will have part 2 of this experiment, which deals with the idea of ‘too much light’, as well as growing succulents under artificial grow lights.


Read Part 2 of this experiment: How much light do succulents need? Part 2 – Is there such a thing as too much light?


18 January, 2022

Succulent in Heatwaves - Top Questions Answered


It seems that summer has now officially arrived, albeit a little late to the party.

The mild start to the season was a delightful treat to everyone and their plants. Then, it seemed without notice, we were blasted into the high 30's and low 40's before we knew it - A lovely Christmas present to us all.

Up in the hills here, we actually lost power for two days over Christmas. This meant our reticulation system was out for the count and we were forced to halt the celebrations to hand water our plants. Oh, the sacrifices we make for the plants!

How did your succulents fair in the heat wave? Are you prepared for the next one?

As we head into the second month of summer (and it seems like the hot weather is here to stay), we thought we would answer some frequently asked questions we are receiving lately about caring for succulents in the heat.


How often should I water during Summer?

One old fashioned rule is to 'water when the soil or mix becomes dry'. I'm not the biggest fan of this rule, as you don't actually want the soil or mix to completely dry out - This will make it become water repellant. When you do get around to watering, the water will sit on top of the soil/mix for a second or two, and then run off to the side, away from the base and roots of the plant. 

If this is the case with your mix, don't fret, it can be corrected - You can use a soil wetting agent to improve water penetration. They come in liquid form and a granular form ( I prefer the granules, you can sprinkle over as needed with ease).

A more modern take on this watering guidline is 'Water when the soil or mix is NEARLY dry'. A little less than damp. But how often is that?

Well, it does depend on a bunch of different factors - Plants inside will need watering less often, as will those in shadier positions in the garden. On the other hand, those plants in pots (especially smaller ones) could be watered once a day in the summer months, as could plants in sunnier positions. Learn to listen to your plants, and look for the signs of dehydration - Wilted or sagging leaves, rosettes shrinking and closing up, loss of colour and brown leaves.

An Echeveria 'Domingo' with heat stress.

An Echeveria 'Domingo' showing signs of heat stress - the rosette has closed up and the leaves are wrinkled and turning brown.

Aloe striata showing heat stress

An Aloe striata in the garden that is suffering in the heat. The rosette has closed up and the leaves are browning and curling.


How can I stop leaves from burning?

There are a few temporary measures you can take to help protect your succulents from burning in the sun if you know the temperature is going to go up past, say, 38 (ish) degrees.

The first is temporary relocation - If your plants are in pots, and you are able to move them, the best option is to place them somewhere for the day, or a couple of days, where the sunlight isn't shining directly on them. Under a verandah or patio is perfect. Ideally, somewhere where they can still receive plenty of indirect sunlight.

The second option is a temporary shade sail, such as shade cloth. The key to creating a great temporary shade sail is airflow. Lift the shade cloth up with stakes as much as you can and avoid having the shade cloth touching the foliage. If it's quite low to the ground, it can create an environment too humid for succulents.

After a couple of days of being under shade cloth, your succulents can start to become leggy and green, so it's not really an ideal situation for the whole summer season, but the perfect temporary solution for those extreme days.


When should I water my succulents?

If possible, try to water your succulents in the cooler times of the day - Either early in the morning or late afternoon. The reason for this is that it can be the combination of water and heat that causes rot in your plants. Sometimes the water can pool on the foliage, especially in the case of rosette type succulents. This pooling creates a 'magnifying glass effect' with the sunlight, which can cause sun damage.

Remember to water succulents thoroughly, so they can develop a lovely strong, deep, root system. This gives them the best chance to defend themselves against the heat.


For the most part, succulents are very water wise, and generally very tolerant of the heat. But during those times where temperatures start getting above 36/38, and especially for an extended period of time, we need to provide them with just a little more TLC so they can get through the season.

05 June, 2019

Keeping Succulents Indoors - A How-to Guide


Choosing Plants:
Opt for succulents that can tolerate low light conditions. Green coloured succulents tend to be low-light tolerant, and are more successfully grown indoors. Succulents with bold, bright colours tend to require more light than an indoor position can offer. These succulents are better suited to outdoor applications in a full sun/part shade aspect.

Haworthia and Gasteria species make fabulous indoor succulents, and then there’s the old classic Mother-in-Law's Tongue, or Sansevieria (pictured), that is an almost indestructible indoor plant.

Choose trailing succulents for indoor hanging baskets or macramé hangers – Succulents like String of Pearls (Senecio rowleyanus), String of Beans (Senecio herreanus) and Rhipsalis species are the perfect choice for indoor hangers.

Browse for low-light tolerant plants in our online store - Fickle Prickles.


Potting Mix:

Always plant succulents into a good quality, cacti and succulent potting mix. Simply put, cacti and succulent potting mix is more ‘free draining’ than regular potting mix, and this helps to keep your succulent’s roots from rotting.

To further improve the drainage of your mix, you can add perlite at a ratio of 1 part perlite to 4 parts succulent mix.


Containers:

Pots with drainage holes are best. If they have saucers, that is perfectly fine, just be sure to empty them after each watering. Succulents don’t like having wet feet for extended periods of time.
If you have containers without drainage, including glassware, there are two potting methods you can try:

1. Expanded clay


Expanded clay is available at some nurseries and most hydroponic retailers. To use it, simply rinse to clean and fill up your desired container. Put a small piece of charcoal in the bottom to filter the water. Rinse your plants of any soil and plant into the expanded clay. Read more about Potting Succulents into Glassware using Expanded Clay on Succulent ART's website.


2. The Charcoal Method


This method works for both terrariums as well as any container in general that lacks drainage. It involves layering a container firstly with charcoal, then sphagnum moss, and then cacti and succulent potting mix. The moss prevents the potting mix falling into the charcoal layer, and the charcoal layer helps keep the water clean. Read more about Potting Succulents into Containers without Drainage on Succulent ART's website.

There’s also the ‘pot cover’ technique, where you keep your succulent planted in its plastic pot, and you then place that inside a decorative pot cover that has no holes. This allows you to take the plant out of its cover every time it needs watering. Very handy.


Light:

Certain plants require more light than others. Some need to be near a window with a significant amount of light, some need to be near a window but will require less light, and some (such as Sansevieria) can tolerate being in the centre of a room with a little amount of light.

The general rule of thumb for succulents is 6 hours of indirect sunlight per day. Remember the sun sits higher in the sky during summer, and lower in the sky during winter, so what may work perfectly in one season, may not in the next. Play around with positions until you find what works best for your succulent.


Water:

1. For containers with drainage holes – Firstly, be sure to water them thoroughly; that is, until the water falls freely out of the bottom. After this, allow time for the water to drain and then put your plant back into place. Try to avoid having water sitting in a saucer by emptying them regularly.

Secondly, allow the mix to almost dry out before the next watering. I’d love to give you a specific schedule, but it is really dependant on the plant and its position. Once a week is a good starting point. More often in Summer, less often in Winter. Remember the rule –Water more, less frequently.

2. For containers without drainage holes - If you are using the expanded clay method mentioned above, keep the water level to no more than one third the way up the container. For the charcoal method, keep the water level to below the moss layer. This will still allow the roots (though capillary action) to receive water without them actually sitting in any water.


Fertiliser:

Use a control release fertiliser once a year, preferably in spring, just before their main growing season. You can also use liquid fertilisers, but dilute the solution to approx half strength.


Learn to listen to your plants:


  • If they are losing their colour and turning dark green, they may need more light.
  • If they are shrivelling and wrinkling, they may need more water.
  • If they are softening and going squishy, they may need less water.
  • If they are growing elongated, they may be reaching for the light. Prune them and place in a brighter spot.
  • Dropping leaves – All succulents lose leaves during their growth cycle. Dead leaves don’t necessarily mean a sickly plant. A healthy succulent will tend to drop its lower leaves, and grow new leaves from the top/centre.


Have fun and experiment!

The great thing about succulents is their ability to ‘hang in there’ until you have time to care for them. You can, in most cases, bring a succulent back to health that is looking worse for wear, giving you the perfect chance to experiment and learn what works and what doesn’t in your particular situation.

Don’t let them get you down if they don’t make it! Temporary plant displays are just as fantastic as long term ones, and will probably cost you less to setup that most cut flower arrangements.
So get to it! Plant up your living room, kitchen, or office and increase your plant/life balance!

05 September, 2018

How to revamp your potted succulents this spring


Spring is here!
Now that the warm weather is on its way, our succulents will be waking up from their sleepy winter and starting to grow. Spring is the start of their prime growing season (well, most species anyway) and is the perfect time to give some attention to those sad looking succulent pots.

Now is the time to weed - Don't sigh, you know it's time... Pull out all those bubba weeds that have shot up. Do it now, before those pots become more weed than succulent. Your plants will thank you for it.

Tidy up - Remove any dead or rotting leaves. This is especially true for your rosette types (Sempervivum/Echeveria) that grow from the centre out and have old, rotting leaves on the outside and underneath the rosette. It's important to remove these to promote new growth and ensure the rot wont spread to the main plant.

Re-pot if necessary - Spring is the perfect time to re-pot those succulents that have been sitting in the same potting mix for several years, or those who's potting mix has collapsed to well below the lip of the pot. Applying a fresh mix is a great way to give your plants a new lease at life, you will be providing them with an abundant source of nutrients, and it will also help with the drainage of your potted succulent, as that old mix has probably become a little water repellent over time.

Now is the time to fertilise - Speaking of nutrients, now is the perfect time to re-apply that control release fertiliser. You can also apply a seaweed or blood and bone solution to give your plants a kick start to spring.

Mulch - Mulch isn't just for the garden. Potted succulents will benefit just as much from a good layer of gravel. Not only does it make the plant 'pop' and look absolutely stunning, it also helps prevent water evaporation from the soil. It provides the roots insulation from the suns rays, which is vital in WA's intense summer heat.

Sun - Spring is the main growing season for most succulents. So make the most of it! Make sure your potted plants are receiving a decent amount of sunshine. Place them in a well lit area and they will burst into life.

06 July, 2018

Succulents and Frosts


We are very fortunate here in Perth to not experience frequent frosts during winter. But that doesn't mean they can't happen - This photo above was taken in July 2015 when the temperatures dipped to below freezing just after the sun rose. It was only for a very short period of time, and it only dipped a little below 0, but still, you can see the effect it had on my poor oregano plant!

Very pretty, but also pretty devastating if you have succulents. Why is that? Succulents retain water in their foliage, which is what gives them their fleshy look. This is what freezes when the temperatures dip. Some succulents are more prone than others - The more 'fleshy' the foliage, the more susceptible they are. Species of Sempervivum, for example, have thinner, tougher leaves. They originate from Alpine regions and can tolerate frosts easier than say, species of Echeveria, with their juicy, plump foliage.

How can you protect your succulents from frost damage?

It is relatively easy to protect your succulent babies from being damaged by frosts, all it takes is a little planning and forward thinking. Like I said, we are lucky to not have below freezing temperatures for very long, and at worse, we generally only see temperatures of -1 or -2, so little changes can make a big difference.

Succulents in Pots:

Pick them up off the ground. Frosts tend to rise from the ground no more than say half a meter, so simply by placing your pots on a table or plant stand, you may have done enough to protect them already.

Minimise their exposure. This can be done by placing them under a verandah or patio instead of outside in the elements. Placing your pots near the walls of your house is also great.

Insulation. Mulch your pots with pebbles and/or gravel. Whilst it may seem like this will only protect the soil and roots of your succulent and not the foliage, stones will retain heat from the day longer than just bare soil. Having your foliage in close proximity to this 'insulation' will help prevent the immediate air around your pot plant from dipping that one degree below zero and generating icicles on your foliage.

Succulents in the Garden:

Gardens are a little trickier to protect, as you cant just 'relocate' them until the weather improves like you can with pots. However the same sort of principles do apply.

Mulch your gardens. As mentioned above, mulching will help keep the immediate air around your plants that little bit warmer than just bare soil.

Plant in mass. A singular plant on its own is exposed in all directions to the cold. Plant in mass and they will create a little eco-system of their own and help keep each other warm. Like you see the penguins do when a blizzard comes!

Use masonry in your landscape design. Sculptures, statues and even large rocks are all perfect at absorbing the sun during the day and cooling down slowly at night. Plant your more susceptible species near these features and it will provide them with protection from the cold.

I hope these tips help you protect your succulent collection from the frosts this winter and get them through to the warmer weather in spring.


08 January, 2018

Succulents in Summer - Tips on how to get your succulents through scorching temperatures

Succulents in Summer - Tips and tricks

As we delve deeper into the Summer months, scorching temperatures are yet again rearing their ugly heads. Perth is renowned for its intensely hot sun, and our recent maximums of  high 30's are only a sign of things to come.

Succulents are, in a way, incredibly drought and heat tolerant. However, they aren't completely immune to burning and stress if they are exposed to extended periods of direct sunlight. This is particularly true of freshly planted succulents whose roots are yet to establish.

However, there is hope! There are a few tricks and techniques that can help get succulents through summer's scorching temperatures.

Protection from the sun: 

If your succulents are receiving direct sunlight for more than even a few hours each day during summer, their foliage may burn. Older, more established plants may be able to hack the pace, but younger plants will need a little protection during this time.

Option 1: Relocation. If your succulents are in pots that are small enough to move, than I would highly recommend temporarily relocating them to a part shade position, such as under a verandah or patio. This is just for the time being, and they can be happily moved back out into a full sun position after the sun starts to calm down later in the season. Be sure that they can still receive plenty of indirect sunlight during this time.

Option 2: Shade Cloth. If your plants are too big to move, or planted into the garden, you can create a little sun shade for them, using a small piece of shade cloth and a few bamboo stakes. It doesn't have to look grand, it just has to temporarily provide protection from the sun. This trick is especially helpful to newly planted succulents, as they may not have had the time to acclimatise to their new environment. Be sure to use 50% shade cloth and not 80%, so the plant can receive enough light.


Watering:

1. Water Thoroughly. Even though succulents are incredibly water wise, it is always a good idea to water them thoroughly until the water drains through the bottom of the pot. If in the garden, water deeply into the soil, so that the entire root system is sufficiently wet. The reason we do this is because a root system will only develop within reach of its water supply. If only the top soil is wet (which is what happens with a sprinkling of water) then the root system will remain small and shallow. This will greatly diminish the plant's defence against the heat, and before long you will start to notice a sickly looking plant.

2. Water during cooler times of the day. If at all possible, water your succulents in the early morning or the late afternoon. Avoid watering during the peak of the day, as the combination of heat and water can cause some succulents to rot. Rosette type succulents in particular will thank you for an early or late drink, as the water can pool in the middle of the rosette and act as a magnifying glass for the sunlight, burning the centre foliage of the rosette.


Soil Condition:

Check to see that when you water your succulents, the water is getting to the roots of your plant and not just sitting on top of the soil. Check not only succulents in the garden but also those in pots, as sometimes the water can run down the inside of the pot and not get into the actual root ball.

If you find this is the case, simply apply a soil wetting agent as directed and you will see the results immediately. Some dire cases may need re-potting, or topping up with fresh potting mix. You can apply a soil wetting agent to your containers and gardens a couple of times over the hot summer. The difference will amaze you. The plants will cope a lot better if they are getting sufficient water.


Mulch:

Mulching your succulents will help keep the evaporation rate of your soil to a minimum. Soil will dry out a lot quicker if it is exposed to sunlight. This principle applies to both succulents in the garden, as well as to those in pots. Wood chips, gravel and pebbles all make excellent mulches, and they can also liven up the look of your plants too, with many different coloured mulches now available on the market.


By following these simple tips and tricks, your succulents will be a little happier over these drearily hot months and continue to grow and thrive long into the New Year.

30 August, 2017

Potted Succulents and Spring - A 'To Do' List


Spring is nearly upon us, and it is a great time to get out in the sunshine and tend to those potted succulents!

Now is the time to weed - Don't sigh, you know it's time... Pull out all those bubba weeds that have shot up. Do it now, before those pots become more weed than succulent. Your plants will thank you for it.

Tidy up - Remove any dead or rotting leaves. This is especially true for your rosette types (sempervivums/echeverieas) that grow from the centre out and have old, rotting leaves on the outside and underneath the rosette. It's important to remove these to promote new growth and ensure the rot wont spread to the main plant.

Re-pot if necessary - Spring is the perfect time to re-pot those succulents that have been sitting in the same potting mix for several years, or those who's potting mix has collapsed to well below the lip of the pot. Applying a fresh mix is a great way to give your plants a new lease at life, you will be providing them with an abundant source of nutrients, and it will also help with the drainage of your potted succulent, as that old mix has probably become a little water repellent over time.

Now is the time to fertilise - Speaking of nutrients, now is the perfect time to re-apply that control release fertiliser. You can also apply a seaweed or blood and bone solution to give your plants a kick start to spring.

Mulch - Mulch isn't just for the garden. Potted succulents will benefit just as much from a good layer of gravel. Not only does it make the plant 'pop' and look absolutely stunning, it also helps prevent water evaporation from the soil. It provides the roots insulation from the suns rays, which is vital in WA's intense summer heat.

Sun - Spring is the main growing season for most succulents. So make the most of it! Make sure your potted plants are receiving a decent amount of sunshine. Place them in a well lit area and they will burst into life.

08 September, 2015

Spring Cleaning!


Now that the warm weather is on its way, our succulents will be waking up from their sleepy winter and starting to grow. Spring is the start of their prime growing season (well, most species anyway) and is the perfect time to give some attention to those sad looking succulent pots.

Should I Re-pot?

The decision to re-pot succulents should not be as daunting as you think. If it doesn't look as healthy as it once did, or it doesn't seem to be to actively growing, then it may be the time to re-pot. They will LOVE you for it. All that extra nutrition and aeration around their roots will get them on the right track to producing some amazing new foliage.

How to Re-pot your Succulents:

  1. Remove any dead leaves and/or give your succulent a light pruning.
  2. To get your succulent out of the pot - Tip it upside down, place your hand under the plant and tap the edge of the pot onto a hard surface until it simply pops out. Try not to pull it out, there is no need, it will come out after a few taps.
  3. Give the roots a light pruning as well - this will encourage new root growth.
  4. Place into your new pot a good quality, well draining cacti and succulent potting mix. You want enough in there so when you place your succulent, the base of the plant is level to just under the top of the pot.
  5. Fill in the gaps with your potting mix, being sure to not press down the mix. This will only compress the soil in the pot and reduce their root growth. Simply tap the pot on the ground instead to get the mix into all the nooks and crannies.
  6. Fertilise with a control release fertiliser.
  7. Water in well.
  8. Mulching is a great idea - You can use gravel, pebbles, a wood mulch - anything you like. Mulch is a great way to keep the roots of your succulent cool during the hot months and help the soil retain water (which means less watering for you!)


No Time to Re-pot?

If you think a re-pot is not needed, or you simply just don't have the time, there are still a few things you can do that your succulents will love you for:

  1. Are they water repellent? Watering sparingly over the winter period is great for succulents, but it may have dried out the potting mix they are in and made it water repellent. Does the water just sit on top? If this is the case, you can use a soil wetting agent. They usually come in liquid form and are available at all independent nurseries.
  2. Pruning - A light pruning will encourage new growth and create a more compact plant. With your rosette succulents, simply remove the dead under leaves.
  3. Fertilise - You can use a combination of seaweed solution and a blood and blone liquid fertiliser to give your succulents a real boost. Now is also a great time to reapply a control release fertiliser.


With just a little bit of effort, your succulents will have the best chance during this peak growing season, and you will be rewarded with lush new growth and maybe even some spectacular flowers. Happy Gardening!

27 May, 2015

5 TIPS to Help Prepare your Succulent Garden for Winter


Winter is fast approaching, and as the cold and the rain begin to rear their ugly heads, we all have concerns on how our arid dwelling plants will cope in these conditions. Well fear no more - Here are 5 important tips to help see your succulents through the Winter season:

1. Sunlight:

In the Garden: Make sure your succulents are getting enough light. Remember, Winter has far less daylight hours than the rest of the year, and overlying tree branches can reduce the amount of light your garden receives.

Try to prune these tree branches back as much as you can to increase the amount of light.

In Pots: If possible, relocate your potted succulents to a position where they can receive a significant amount of light over Winter.

2. Soil:

In the Garden: Check that your soil is free draining. This is so important. I cannot stress this enough. With all the rain that will be soaking the soil over Winter, it is important that the majority of it can freely run away from the immediate area.

To help improve the drainage of clay like soils, add Gypsum, a product that helps break down and loosen clay. Simply follow the instructions on the packaging to add it to the soil. Mix it through your soil and water in thoroughly.

In Pots: Check that your potting mix hasn't collapsed. Collapsed potting mix can create a perched water table at the bottom of the pot, and this causes the water to not be able to drain.

If this is the case, remove the lower collapsed potting mix and replace with new fresh cactus and succulent potting mix. Place feet under the pot so that the water can freely drain.

3. Pruning:

In the Garden: Avoid pruning through the Winter months. This creates a wound on the plant, where infections can set in and rot your succulents.

In Pots: This rule applies to potted succulents too.

4. Protection:

In the Garden: Mulch the garden bed to keep the soil warm. This will protect the surface roots from the cold and frosts. Be sure to keep the mulch away from the base of your succulent, as this can cause rot.

Place large rocks and masonry statues next to your succulent to help radiate heat and keep the temperature immediately around your plants warm. This is great in frost areas.

In Pots: Protect cold sensitive plants like Sanseveria and any tropical succulents by placing them under cover. Cacti should also be under cover for the Winter period. Add a layer of stones or pebbles to your pots to help keep the soil warm.

5. Water:

In the Garden: Turn off your reticulation. A silly point to mention, but it is easy to forget to disable automated systems over Winter. Not to mention you risk getting a $100 fine from the Water Corporation if you use your sprinklers from the 1st June to the 31st August and are located in either Perth, Mandurah or some parts of South West WA.

In Pots: Reduce watering your succulents over Winter as the water evaporation rate of the soil reduces significantly during this period. You can tell if your succulents will need watering by burying your finger in the soil. If it is dry, water it.


Hopefully these tips will help prepare your succulents for the cold and rainy season, and keep them looking great for the next few months to come.

04 February, 2015

Mealybug - How to get rid of them and keep them away for good!


What is Mealybug?

Mealybug is a sap sucking insect that can rapidly spread throughout a succulent collection and cause very ill plants. Tiny cotton threads can be seen on the foliage. They usually hide in tiny crevices and reproduce rather quickly. Many people use methylated spirits on a cotton bud or white oil to remove them however once they are there it is very difficult to remove entirely.

These little guys don't stop at the foliage. They can also infest your roots.

Root Mealybug spreads like wild fire once it gets hold in your pots. And unfortunately you don't know it is there because it is on the roots of your plant. Tip your plant over and take the pot off. They look like white cotton throughout the potting medium. Eventually they can kill your plant and can easily spread to all of your collection.

What are the signs?

If you see Ants hanging around your pots there is a good chance that there are Mealybug or some other sap sucking insect like scale attacking your plant. Most sap sucking insects including Mealybug, excrete a sticky residue, and this is what the ants are attracted to. Contrary to popular belief, removing the ant problem is not going to get rid of the Mealybug. Get rid of the Mealybug and the ants will disappear for they will not have anything to feed apon.

How do I keep Mealybug away from my collection?

Prevention is by far the best solution:


  1. Avoid using second hand pots. Mealybug can be transferred from the pot to the plant.
  2. Never use second hand potting mix.
  3. If you find they are infested on the roots throughout your plant, take cuttings (as long as the foliage is free of them) and throw your plant in the rubbish.
  4. If the Mealybug is on the foliage, isolate the plant from your other plants and apply a systemic pesticide, alcohol spray or soapy emulsion. If they are seriously infested, throw the plant out. It is just not worth the risk. Apply the pesticide to your other succulents at the same time for a preventative measure.


Good hygiene when handling your plants is very important. Also, keep your plants healthy with regular feeding, sufficient water, adequate light and excellent drainage. All this and the occasional application of a seaweed solution helps the plant defend itself against Mealybug by helping to build strong cell walls. If the insect can't penetrate the strong thick cell walls they can't feed. Healthy Plants are happy plants and are generally bug free!

23 May, 2012

Rain and your Plants

Winter’s continuous rain can, from time to time, rot some of your precious succulents and cacti.
Having your favourite species in pots means that you can move them to areas where the watering can be controlled by you.
Move them to under the eaves of your house or under your pergola for Winter.
They will thank you for it!!!


06 October, 2011

Mulch it! Mulch it good!

Before our hot summer rears its warm, ugly head, It's time to start thinking about mulching your gardens. You may not realise it, but succulents benefit greatly from a good mulching too!

In this photo: Echeveria 'Topsy Turvy' and Echeveria 'Dondo'.

Adding mulch around your succulents in your garden helps to:
  • lower the soil temperature
  • retain moisture within soil
  • reduce water evaporation rate
  • reduce soil erosion
  • suppress weeds
Here, we have used Red Gum wood chips because of the nice red colour, but you can use whatever is available - wood chips, pebbles, gravel - It's up to your imagination.

TIP - Make sure you lay it on thick! For wood chips, 100mm thick will do the job nicely. ALSO, make sure you keep the mulch away from the base of your plants (unlike our photo here!) - this helps to prevent rotting at the base of your plants.

So...How much mulch will I need, and where do I get it from?
You can get mulch from any good garden centre or landscape supplier, and quantities are usually measured in cubic metres. To find out how many cubic metres you will need, simply times the length by the width of your space, then times that by the thickness/height of your mulch:


For a garden 2m long by 3m wide:
2m x 3m x 0.1m (100mm thick) = 0.6m3 (0.6 cubic metres)


So go out there and have some fun mulching your succulents!
And be proud of your garden!!! Go take a photo or two, post them on our Facebook Page and boast about your hard work! Go on... all the other kids are doin' it :)


26 August, 2011

Is your Cactus looking Cactus?


Is your Cactus looking Cactus???

Is your cactus looking a little sad and depressed at the moment?
Well, don't stress out about it too much, because you might find that he's just suffering from the Winter Blues!

During the winter months most species of cacti tend to go into a dormant state, and because of this they don’t like very much water.
So... Are you guilty of over-watering your cactus this month?
If you are, this may be the reason why he looks a little on the sad side - his roots may be sitting in water and slowly rotting away.
If this is the case, let him dry out and you will find that he will bounce back when the weather warms up.

So remember - during the winter months, let your cacti dry out between waterings. They will love you for it!!!

06 August, 2010

Caring for Cacti


Cacti make excellent additions to anyone’s garden, veranda, table top, shelf, desk – Indoors or outdoors, the options are endless! And with their amazing ability to adapt to their environment, they are super easy to look after and care for.
Here are some basic tips to keep in mind:

Sunshine
Cacti like a decent amount of light. If they are indoors, the best place to keep them is next to a window. If they are outdoors, under a patio or veranda in a spot where they can receive indirect sunlight is the perfect position. They can withstand being out in the full sun for most of the year, but some can burn if they are kept out in the sun during the summer months. Ideally, try to aim for a position that has ample light, but only a small amount of direct sunlight. South facing positions are always an excellent choice.
Water
Spring, Summer and Autumn
Most Cacti have their main growing period in spring, summer and autumn. During this time they can be watered quite frequently. In the middle of summer you may find that they need watering every couple of days. The frequency of watering really depends on the container and the position they are in, as well as the time of the year. The most general rule of thumb is – If the soil is dry, water them!
Winter
During winter, most cacti go into a dormant state and will need to be kept dry for long periods of time. Watering 3 or 4 times during the whole winter period will most likely be sufficient. Remember, the main culprit of sickly or dying cacti is rot caused by over-watering in winter - so do try to minimize watering during this season. It is also a good idea to keep them under cover during winter and away from the rain. Try to avoid using saucers under your pots unless you are happy to empty them after each watering. Cacti don’t like to sit in water for any period of time.
Potting mix
If it comes time for you to re-pot your cactus, remember that all cacti need to be potted into a well draining cactus mix. There are several commercial cactus and succulent mixes on the market that offer adequate drainage, however you can always improve the quality of the mix by adding 1 part of perlite or coarse grain sand to every 3 parts of potting media. Re-pot your cactus every few years to encourage new growth.
One Last Thing…
Mealybug and Scale can cause problems for our prickly friends, but luckily they are problems you can easily rectify. If you see cottony looking bugs or raised spots on the body of your cactus, simply spray them with a systemic insecticide. This will help to keep these pesky little devils at bay.
See, it really is easy to look after your prickly friends, and by following these basic tips, your cactus will continue to look magnificent for years and years to come!
Collect, admire and enjoy!