
Give those old picture frames a new lease on life and create a stunning living art piece for your home, garden or office. It’s the perfect project for those with limited garden space, as these art pieces hang vertically – All you need is some wall space!
It’s an easy to do weekend project for you and the family – Customizing an old picture frame takes no time at all, and the results are truly fantastic! Get the kids involved too!
What is an Elkhorn?
Elkhorns are an epiphytic fern called Platycerium bifurcatum, and they naturally grow without soil by attaching themselves to trees, fallen logs and sometimes even rocks. It’s because of this that they make the perfect hanging vertical plants, offering architerural foliage and a burst greenery to a space.

What’s difference between an Elkhorn and a Staghorn?
Elkhorns (Platycerium bifurcatum) and Staghorns (Platycerium superbum) are both epiphytic in nature. The differences are the size of the plants, with Elkhorns having smaller, more narrow fronds. The main difference is the way it reproduces – The Elkhorn can multiply or pup quickly from ‘growing points’ on the plant. New leaves form from these growing points and soon develop into new, independent plants. With time, you can split up your Elkhorn to make more vertical frames, or leave them be for an epic mass display. The Staghorn on the other hand, reproduces from spores, and will generally remain one, albeit a lot larger, solitary plant.
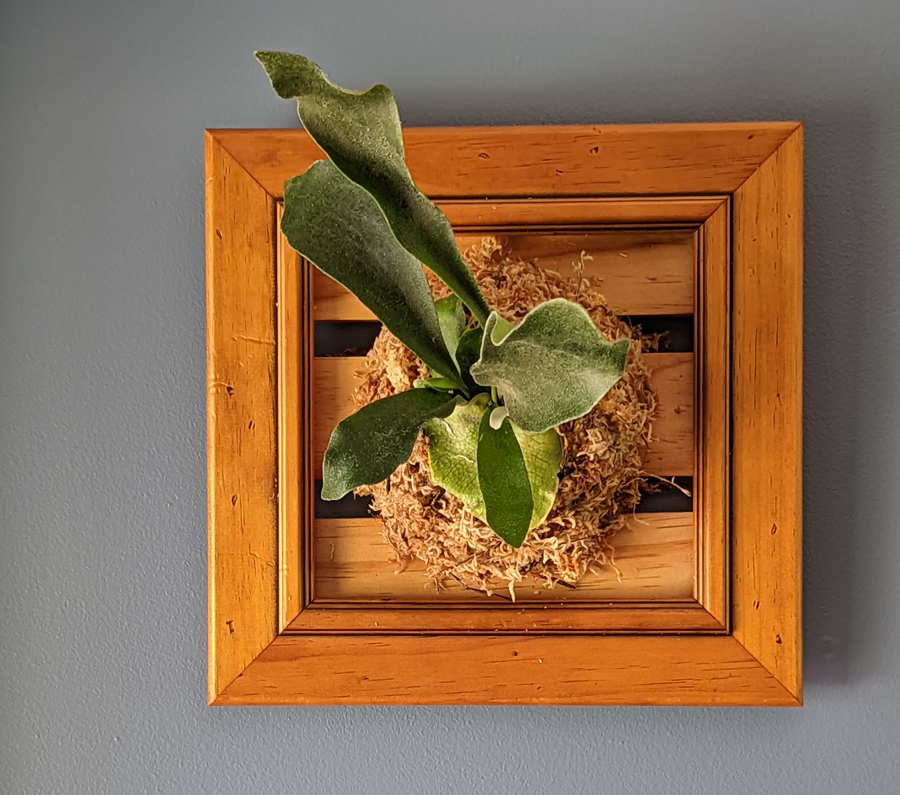
Sourcing Frames
To start this project we first need to source some old picture frames. Now, you may have some lying around the house, but if not, do not fear, they are very easy to come by. Try Road side collections or Op-shops. It’s best to choose wooden frames, as we will be nailing a backing board to it (something to attach the Elkhorn to).

You will also need
- An Elkhorn plant
- Pine wood lengths
- Saw, glue and nails
- Sphagnum moss
- Fishing line
Customising the Frame
To start, we need to remove the glass, the backing and any nails or staples that are not needed. Usually the backings that come with picture frames are made of chipboard, and don’t have the strength to hold up a plant, so we will need to replace this with something stronger.
We have used pine lengths, 64mm in width. You can use hardwood, it will be more rot resistant, but you will find that most commercial wooden frames are already made of pine and are finished with a stain or varnish. We will be sealing the back of the frame to give it a longer life and have it hold up to the elements.

To create the backing board, simply cut pieces slightly shorter that the width of the frame, and attach with PVA glue and nails. Our design uses a couple of horizontal lengths of pine, with spaces in-between. These spaces will come in handy when tying the Elkhorn to the frame, and it offers a stylish look compared to a solid, one piece backing board.
Once the glue has dried, we can move on to sealing it. There are a plethora of different options and products that are available to seal raw pine. We have chosen linseed oil, as it will bring out the natural wood grain in the pine. It is also a natural product that won’t be toxic to the Elkhorn itself.
To attach the Elkhorn, we need to decide which way is up. Once an Elkhorn reaches a certain age, it will start developing a sheath. This will grow underneath the fronds and will eventually expand to envelop the plant and backing board on the frame. Identifying the sheath is simple enough – look for a flat rounded leaf growing from the base or ‘growing point’ of the plant. Spin the plant around so this sheath is at the bottom. Remove the Elkhorn from its growing pot and shake loose most of the potting mix. Try to retain a small amount of the potting mix around the root ball if you can.

Using fishing line, wrap the Elkhorn (moss and all), several times around the backing board, threading the line through the gaps in the pine slats as you go. Cross over the line in different directions to make it more secure, and try to tuck the line in under sheath where you can. It does help to have an assistant at this point – If they can hold the frame and plant up from your working table, it makes it far easier to thread the line through the gaps in the frame and wrap it around the ball of moss. Once it’s sufficiently secured, you can tie off the ends of the line and trim the excess. Fishing line is very forgiving if you are not the neatest at this step - It is clear in colour, so very discreet and hidden!

Hanging
To hang the frame, we have attached some hardy string (you could use wire) with a staple gun on the back of the frame. Horticultural hooks come in handy to hang your frame from a verandah beam, or you can simply hang it just like a picture frame from a fixing on the wall.
How to care for an Elkhorn
Keep your Elkhorn in a well lit area, away from direct sunlight. You can keep them indoors, as long as the room is not too dark and the plant can receive plenty of light. It’s important that the sphagnum moss doesn’t dry out, so be sure to water them thoroughly and often to keep the moisture up to it. You can feed it during its growing season (spring to early autumn) with a diluted liquid fertilizer/seaweed solution, or with a small handful of control release fertilizer.
No comments:
Post a Comment