26 May, 2022

Upcycle old Picture Frames into Living Hanging ART!


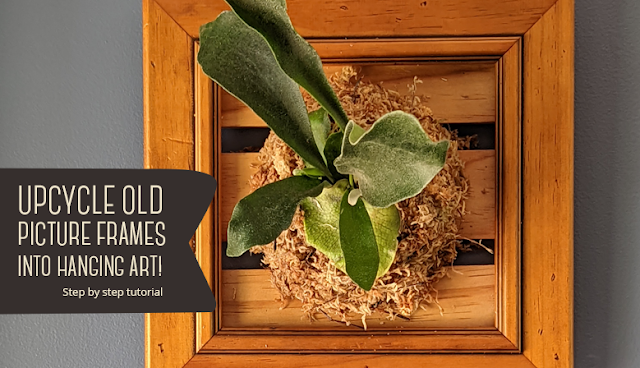
Give those old picture frames a new lease on life and create a stunning living art piece for your home, garden or office. It’s the perfect project for those with limited garden space, as these art pieces hang vertically – All you need is some wall space!

It’s an easy to do weekend project for you and the family – Customizing an old picture frame takes no time at all, and the results are truly fantastic! Get the kids involved too! 


What is an Elkhorn?

Elkhorns are an epiphytic fern called Platycerium bifurcatum, and they naturally grow without soil by attaching themselves to trees, fallen logs and sometimes even rocks. It’s because of this that they make the perfect hanging vertical plants, offering architerural foliage and a burst greenery to a space.

What’s difference between an Elkhorn and a Staghorn?

Elkhorns (Platycerium bifurcatum) and Staghorns (Platycerium superbum) are both epiphytic in nature. The differences are the size of the plants, with Elkhorns having smaller, more narrow fronds. The main difference is the way it reproduces – The Elkhorn can multiply or pup quickly from ‘growing points’ on the plant. New leaves form from these growing points and soon develop into new, independent plants. With time, you can split up your Elkhorn to make more vertical frames, or leave them be for an epic mass display. The Staghorn on the other hand, reproduces from spores, and will generally remain one, albeit a lot larger, solitary plant.


Sourcing Frames

To start this project we first need to source some old picture frames. Now, you may have some lying around the house, but if not, do not fear, they are very easy to come by. Try Road side collections or Op-shops. It’s best to choose wooden frames, as we will be nailing a backing board to it (something to attach the Elkhorn to).


You will also need

- An Elkhorn plant

- Pine wood lengths

- Saw, glue and nails

- Sphagnum moss

- Fishing line


Customising the Frame

To start, we need to remove the glass, the backing and any nails or staples that are not needed. Usually the backings that come with picture frames are made of chipboard, and don’t have the strength to hold up a plant, so we will need to replace this with something stronger.

We have used pine lengths, 64mm in width. You can use hardwood, it will be more rot resistant, but you will find that most commercial wooden frames are already made of pine and are finished with a stain or varnish. We will be sealing the back of the frame to give it a longer life and have it hold up to the elements.

To create the backing board, simply cut pieces slightly shorter that the width of the frame, and attach with PVA glue and nails. Our design uses a couple of horizontal lengths of pine, with spaces in-between. These spaces will come in handy when tying the Elkhorn to the frame, and it offers a stylish look compared to a solid, one piece backing board.

Once the glue has dried, we can move on to sealing it. There are a plethora of different options and products that are available to seal raw pine. We have chosen linseed oil, as it will bring out the natural wood grain in the pine. It is also a natural product that won’t be toxic to the Elkhorn itself.


Attaching the Elkhorn

To attach the Elkhorn, we need to decide which way is up. Once an Elkhorn reaches a certain age, it will start developing a sheath. This will grow underneath the fronds and will eventually expand to envelop the plant and backing board on the frame. Identifying the sheath is simple enough – look for a flat rounded leaf growing from the base or ‘growing point’ of the plant. Spin the plant around so this sheath is at the bottom. Remove the Elkhorn from its growing pot and shake loose most of the potting mix. Try to retain a small amount of the potting mix around the root ball if you can. 


Laying the frame flat on a table, place a layer of hydrated sphagnum moss in the middle of your frame, then place the Elkhorn on top (remembering which way is up once it’s hung vertically!).  Then add more sphagnum moss around the edges to enclose the root ball and soil, being sure to leave the sheath exposed.

Using fishing line, wrap the Elkhorn (moss and all), several times around the backing board, threading the line through the gaps in the pine slats as you go. Cross over the line in different directions to make it more secure, and try to tuck the line in under sheath where you can. It does help to have an assistant at this point – If they can hold the frame and plant up from your working table, it makes it far easier to thread the line through the gaps in the frame and wrap it around the ball of moss. Once it’s sufficiently secured, you can tie off the ends of the line and trim the excess. Fishing line is very forgiving if you are not the neatest at this step - It is clear in colour, so very discreet and hidden!


Hanging

To hang the frame, we have attached some hardy string (you could use wire) with a staple gun on the back of the frame. Horticultural hooks come in handy to hang your frame from a verandah beam, or you can simply hang it just like a picture frame from a fixing on the wall.


How to care for an Elkhorn

Keep your Elkhorn in a well lit area, away from direct sunlight. You can keep them indoors, as long as the room is not too dark and the plant can receive plenty of light. It’s important that the sphagnum moss doesn’t dry out, so be sure to water them thoroughly and often to keep the moisture up to it. You can feed it during its growing season (spring to early autumn) with a diluted liquid fertilizer/seaweed solution, or with a small handful of control release fertilizer.

11 April, 2022

How much light do Succulents really need? Part 2 of 2 – Too Much Light??


How much light do succulents need? Part 2 – Is there such a thing as too much light?

I recently conducted an experiment keeping succulents under various light conditions. 3 identical sets of plants, one set kept in a dark room, one under some artificial grow lights, and one grown as a control in the stable conditions of our succulent nursery. The purpose of the experiment was to provide some side by side photos in order to help point people in the right direction about finding the ideal spot at home to grow succulents.

In part 1 of this story, I discussed the results of the plants grown in a dark room. After 7 days, the succulents starting showing signs of lack of light and by day 12 they looked quite light deprived compared to the control plants. If you would like to view the results of that comparison, and see some tips on how to rectify the symptoms of lack of light in succulents, please head to Part 1: Signs of Lack of Light.

In part 2, I want to talk about the plants I kept under artificial grow lights. Now, I chose to add this to the experiment, because keeping succulents in an indoor location can be impractical if they don’t receive enough light in that room. By adding a grow light to your indoor succulents, you can supplement that indirect light it receives thorough a window, and you can successfully keep a nice, healthy compact plant indoors.

But for how long each day should you have this grow light on for? This is the question I wanted to answer by placing these plants under these lights. And thus, the experiment continues!

Now, if you would like to get into the science of how grow lights work, including the light spectrum, different wavelengths/colours, LED vs incandescent, it’s a big subject you can really sink your teeth into, and I do recommend delving into that rabbit hole if you have time. However for this experiment, I’m keeping it simple – I actually used an aquarium light passed on to me from my partner who really likes to keep fish. I confess, it’s a rather cheap light. I don’t have too many specs on it, only that it is 24w LED, and they are white coloured LED’s. I’ve germinated seeds under this light before and I’m very happy with the results.


THE EXPERIMENT

The Plants

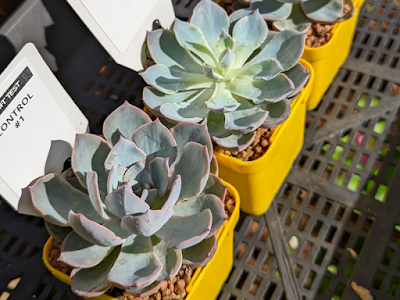
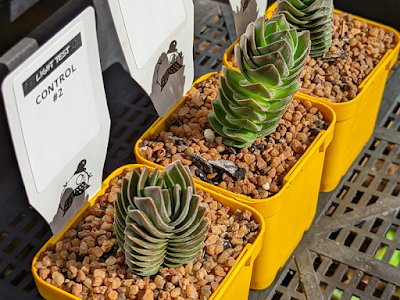
Just as a reminder, the succulents I chose for this experiment were ‘Echeveria Morning Beauty’ and Crassula ‘Buddah’s Temple’. I chose the Morning Beauty because of its bright blue colour, and for its rosette shape, the Buddah’s Temple I chose because its deep green colour, and its upright growth habit.


The Conditions

All the plants were from the same batches – They were the same age, same potting media, same pot size, and had the same watering schedule up until the start of the experiment.

The control plants in this experiment were placed out in the nursery, and they received about 8 hours of sunlight per day. They were under hail net which filters out a small fraction of light. They were watered every day, as I conducted this experiment at the end of summer.

The indoor plants were kept in a room I know to be too dark to grow succulents. Although next to a window, the indirect light was just too filtered to be sufficient for healthy growth. They were watered every second or third day.

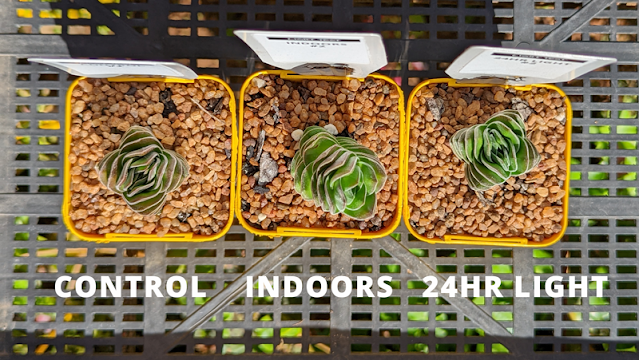
The grow light plants were placed inside a glass tank, with the LED bar light about 25cm above them. They were watered every second or third day.

I kept this light on in this tank for 24 hours a day for the duration of this experiment.

The reason why? To see whether there is such a thing as ‘too much light’.  I’ve read up on the idea of light toxicity and the detrimental effect  it can have on plants, and Kaye tells me it does exist (She is the horticulturalist in the family, who am I to disagree…) BUT, I just really wanted to see the results for myself.


THE RESULTS

Day 1


Day 3


Day 7


By day 7 there still weren’t too many differences in the plants – All 4 plants were very healthy. In fact, the Morning Beauty under the 24 hour light was doing far better than I could have expected. The foliage was strong and the rosette nice and compact. No signs of light toxicity at all.

Day 12


It was by Day 12 that I was really impressed. Both plants under the 24 hour light were absolutely thriving. The blue colour in the Morning Beauty was so intense.

Day 15 – The final Comparison


Wow. Very unexpected results. Putting all 6 plants in this experiment side by side to compare made the results very clear. No light toxicity to be seen! The intense blue colour in the Morning Beauty kept under the grow lights is just stunning. The Buddah’s Temple faired well too, however the control is just a tad more sun hardened, you can see that by the bronze colour it shows.

So, if you have succulents you wish to place indoors, in a spot that may be a tad too dark for healthy growth, definitely think about using a grow light. As for how long to keep the light on for each day, I would start at the basic 8 hours of light per day to mimic the sun’s behaviour. You can always increase of decrease it based on the look of your plants. Timers work great so you don’t have to remember to switch them on every day, and I like to offset the 8 hours and run my lights from noon to 8pm, so I can enjoy seeing my succulents all lit up in the evening.


Read Part 1 of this Experiment, How much light do Succulents really need? Part 1 of 2 – Lack of Light


16 March, 2022

How much light do Succulents really need? Part 1 of 2 – Lack of Light

How much light do Succulents need?

How much light do Succulents really need?

It’s a question that is asked quite often, and unfortunately, there is no universal, one size fits all answer. Succulents are a family of plants that originate from all around the globe, from all different types of environments - Tropical, Arid and even Alpine. It’s what makes them so fascinating to grow, as they offer so many different colours, textures and shapes.

The best approach in narrowing down what your succulent may need in terms of light, is to research what area it originates from, and replicating that at home. In combination with that, my best advice is to simply keep an eye on your succulent. If it is showing signs of lack of light, it’s time to make some adjustments.


What are the signs of lack of light in succulents?

To answer this question, at first I wanted to put some succulents in a dark room and take some photos after a week or two to highlight the visual signs of lack of light. Then I thought I should have some ‘control’ plants grown out in our nursery to offer as a comparison. THEN, I took it one step further and added to the experiment some plants grown under artificial grow lights, and you can read all about that in part two of this article coming up next month.


THE EXPERIMENT

The Plants

The succulents I have chosen for this experiment are ‘Echeveria Morning Beauty’ and Crassula ‘Buddah’s Temple’. I chose the Morning Beauty because of its bright blue colour, and for its rosette shape, the Buddah’s Temple I chose because its deep green colour, and its upright growth habit. 


The Conditions

All the plants are from the same batches – They are the same age, same potting media, same pot size, and have had the same watering schedule up until now.

The control plants in this experiment will be placed out in the nursery, and they receive about 8 hours of sunlight per day. They are under hail net which filters out a small fraction of light. They are watered every day, as it is the end of summer.

The indoor plants will be in my living room – A room I know to be too dark to grow succulents. Placed on a side table near a window, you may think that would be sufficient, however on the outside of the window is a rather deep undercover area. So, although there is some light coming in, it is not enough to promote healthy growth (except for my ZZ plant, which I’m pretty sure grows on magic pixy dust and not light, because it is absolutely thriving in that room!). As for watering they will be watered every second or third day, when they start looking a little dry.


THE RESULTS
Day 1

Day 1 - Lack of lIght Experiment


Day 3

Day 3 - Lack of light Experiment


Day 7

Day 7 - Lack of light Experiment


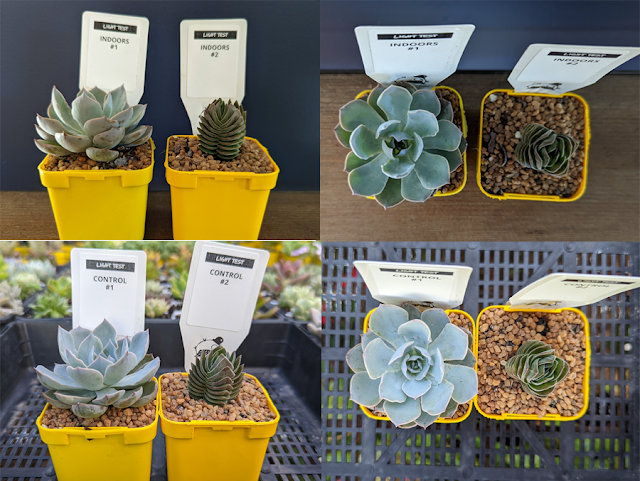
On day 7 you can see that the indoor Echeveria is starting to lose its colour towards the centre of the rosette. The Crassula is growing a little elongated as it reaches for light, and It is also starting to get a little pale in colour.


Day 12

Day 12 - Lack of light Experiment


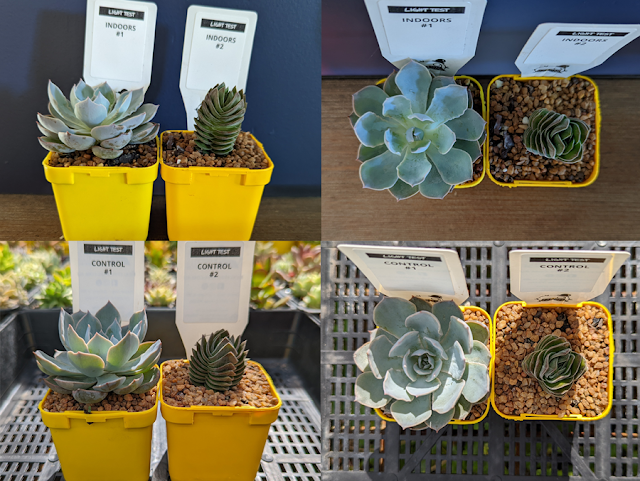
By day 12 the Echeveria has lost more colour from the centre, and is flattening its shape compared to the control. The Crassula is much taller than the control now, and you can start to see the leaves flattening out, similar to the Echeveria.  The leaves on the control Crassula by comparison remain nice and compact.


Day 15 – The Final Comparison

Day 15 - Lack of light Experiment

Day 15 - Lack of light Experiment

Day 15 - Lack of light Experiment

Day 15 - Lack of light Experiment


As you can see, the differences are quite stark side by side on day 15, the last day of the experiment. The Crassula fared much better indoors than the Echeveria, and that’s due to its green colour which makes it more tolerant of low light conditions.


Signs of lack of light to watch out for:

Lack of colour in the foliage
Elongated growth
Flattening of rosettes or the separation of leaves
Leaves becoming soft, and sponge-like.


What can I do about it?

If you start seeing these signs in your succulents, it may be time to relocate them. You can give them the best chance to get healthy again with a few simple tips:

1. Try not to put them into a bright sunny position straight away, as this can shock them and they will go downhill quite quickly. A gradual introduction of more light is the way to go. 

2. Avoid watering too often during this period – This especially applies to rosette types, as an intake of too much water could cause them to rot.

3. Don’t fertilise a sick plant – This generally applies to most plants, not just succulents. Wait until you see some fresh healthy growth to apply a fertiliser.

4. Prune if you can – This applies to upright types, if you cut back the elongated growth, new growth will shoot away and you should start to see a nice compact plant.

5. In the case of the Echeveria, it may be too far gone to save that one rosette, BUT you may find that it will pup because it is in a stressed state. Those pups will send down roots and grow to fill up the pot space.


I hope this article points you in the right direction about finding the ideal spot in your home to grow succulents. Hopefully it will help you identify signs of lack of light, and what you can do to help them out.  In our next newsletter, we will have part 2 of this experiment, which deals with the idea of ‘too much light’, as well as growing succulents under artificial grow lights.


Read Part 2 of this experiment: How much light do succulents need? Part 2 – Is there such a thing as too much light?


01 February, 2022

Garden ART: Old Chair to Charming Succulent Planter!

Cactus Chair

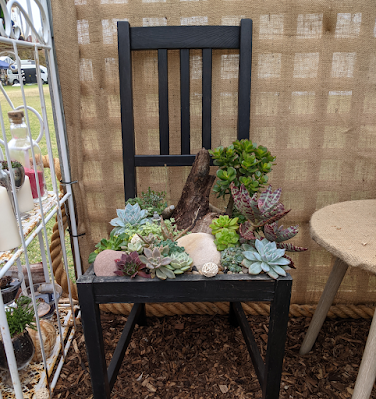
Have an old chair sitting around the house gathering dust? Well, why not UPCYCLE it into a charming succulent planter and create a unique feature for your garden that will be a talking point for all of your visitors. 

Chairs are plentiful at op-shops, recycling centres and road side collections, and they are often made of hard wood, which means a strong sturdy base that will tolerate both water and sunlight. A breezy weekend project, a succulent chair like this will look fabulous in all garden sizes, even the smallest of patio spaces.


Preparing the Chair:

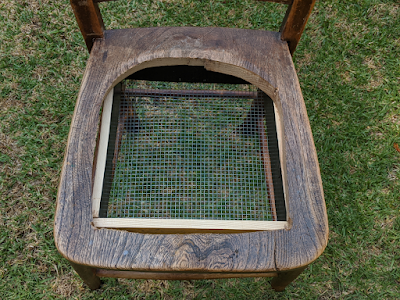
Creating a Hole – Some chairs come with a padded seat, that when removed reveal a perfect frame to plant into. Other chairs will require a hole to be cut in the seat. This extra step can be advantageous, as you can cut the hole to any size or shape – circular, square, curved at the back. Cut as much or as little of the seat away as you desire.

Building Depth – The deeper the planter box is in the chair, the more established the roots of your plants can become, extending the life of your display. And again, some chairs come with a perfect frame that’s a good 5cm – 10cm deep. But if this isn’t the case, you may need to add a wooden frame to the bottom of the seat to create some depth. If you’re not the best at DIY wood work, don’t be afraid! It doesn’t have to look super neat; you won’t see much of the frame once it is all planted up.

Succulent Chair Hole

Attaching a Bottom – We stapled wire mesh to the bottom of our seat’s frame. Mesh is ideal to use in this circumstance, as it allows water to drain freely. Don’t worry about your potting mix falling though just yet - We will cover that shortly.

Attaching mesh to the hole

Styling – You can paint your chair in a vibrant colour, or keep it natural like we have done. Shabby chic is popular right now, and is very easy to accomplish by painting on a colour and then sanding it half away. A coat of sealant will protect the wood and make it last longer, but isn’t entirely necessary if you don’t have the time.

Succulent Chair hole and frame


Planting it up:

Moss – Place a layer of sphagnum moss in the bottom of your frame. This will prevent potting mix falling through the mesh. Sphagnum Moss comes in dehydrated bricks and to prepare it, simply soak it in water for 10 to 15 minutes.

Potting Mix – Next, fill with a good quality, free draining cacti and succulent potting mix. Use large natural objects like rocks, logs or drift wood to create height in your base, and then fill in the spaces between with your mix.

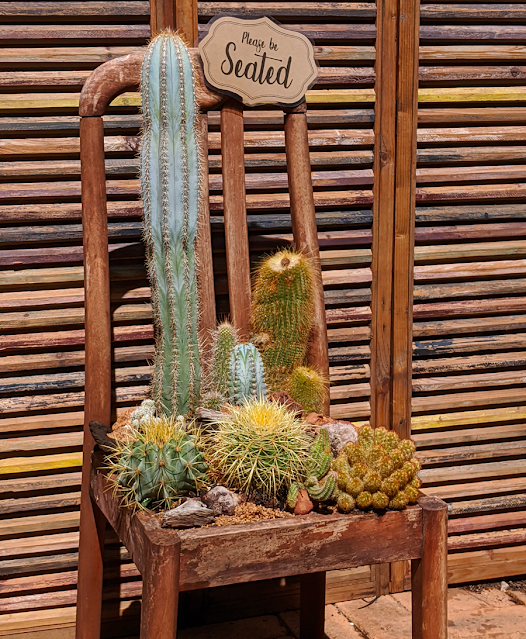
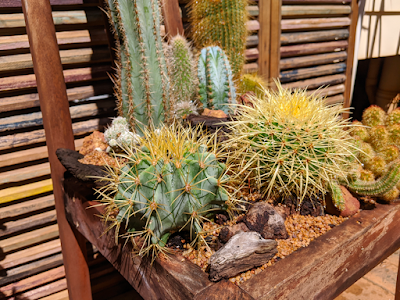
Plants – Start by planting the largest feature plants first and work your way down to the small fillers. Combine succulents with similar colours and shapes for a classic, sophisticated design, or play with different colour and shape combinations for a more eclectic look. We have planted ours out entirely with Cacti – Taller ones at the back and squattier ones at the front. We also used a small log as a retaining wall in the middle to give the back section more height.

Cactus Chair

Mulch - Once you are happy with the design, water in the plants before applying a topping of gravel or small pebbles. A topping like this helps insulate the roots from intense heat or cold and prevents the mix from drying out and becoming water repellent. It is also helpful in securing plants into place, and preventing soil erosion. Water thoroughly a second time to allow the gravel to settle.

Succulent Chair


Maintenance:

Sun - Keep your chair in a nice, bright spot. Avoid direct sunlight in the afternoon and on days where the temperature is over 38 degrees. 

Succulent Chair

Water - Water thoroughly every couple of days when the weather is mild. Water more often in the hotter months and cut right back during winter.

Pruning and Fertiliser - Prune the foliage every so often to keep the plants nice and compact, and remove any dead foliage. Fertilise with a control release fertiliser as directed.

Cactus Chair - PGF2021

This is our cactus chair as part of our SPELLBOUND display at the Perth Garden Festival 2021. The sign reads: "Complaints department - Please take a seat..."


18 January, 2022

Succulent in Heatwaves - Top Questions Answered


It seems that summer has now officially arrived, albeit a little late to the party.

The mild start to the season was a delightful treat to everyone and their plants. Then, it seemed without notice, we were blasted into the high 30's and low 40's before we knew it - A lovely Christmas present to us all.

Up in the hills here, we actually lost power for two days over Christmas. This meant our reticulation system was out for the count and we were forced to halt the celebrations to hand water our plants. Oh, the sacrifices we make for the plants!

How did your succulents fair in the heat wave? Are you prepared for the next one?

As we head into the second month of summer (and it seems like the hot weather is here to stay), we thought we would answer some frequently asked questions we are receiving lately about caring for succulents in the heat.


How often should I water during Summer?

One old fashioned rule is to 'water when the soil or mix becomes dry'. I'm not the biggest fan of this rule, as you don't actually want the soil or mix to completely dry out - This will make it become water repellant. When you do get around to watering, the water will sit on top of the soil/mix for a second or two, and then run off to the side, away from the base and roots of the plant. 

If this is the case with your mix, don't fret, it can be corrected - You can use a soil wetting agent to improve water penetration. They come in liquid form and a granular form ( I prefer the granules, you can sprinkle over as needed with ease).

A more modern take on this watering guidline is 'Water when the soil or mix is NEARLY dry'. A little less than damp. But how often is that?

Well, it does depend on a bunch of different factors - Plants inside will need watering less often, as will those in shadier positions in the garden. On the other hand, those plants in pots (especially smaller ones) could be watered once a day in the summer months, as could plants in sunnier positions. Learn to listen to your plants, and look for the signs of dehydration - Wilted or sagging leaves, rosettes shrinking and closing up, loss of colour and brown leaves.

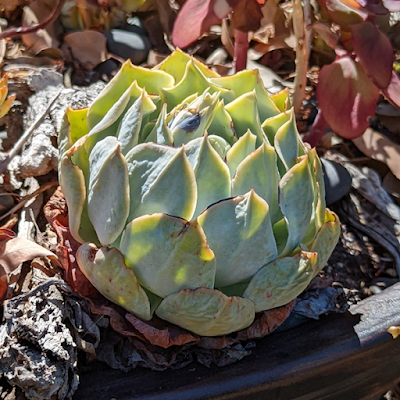
An Echeveria 'Domingo' with heat stress.

An Echeveria 'Domingo' showing signs of heat stress - the rosette has closed up and the leaves are wrinkled and turning brown.

Aloe striata showing heat stress

An Aloe striata in the garden that is suffering in the heat. The rosette has closed up and the leaves are browning and curling.


How can I stop leaves from burning?

There are a few temporary measures you can take to help protect your succulents from burning in the sun if you know the temperature is going to go up past, say, 38 (ish) degrees.

The first is temporary relocation - If your plants are in pots, and you are able to move them, the best option is to place them somewhere for the day, or a couple of days, where the sunlight isn't shining directly on them. Under a verandah or patio is perfect. Ideally, somewhere where they can still receive plenty of indirect sunlight.

The second option is a temporary shade sail, such as shade cloth. The key to creating a great temporary shade sail is airflow. Lift the shade cloth up with stakes as much as you can and avoid having the shade cloth touching the foliage. If it's quite low to the ground, it can create an environment too humid for succulents.

After a couple of days of being under shade cloth, your succulents can start to become leggy and green, so it's not really an ideal situation for the whole summer season, but the perfect temporary solution for those extreme days.


When should I water my succulents?

If possible, try to water your succulents in the cooler times of the day - Either early in the morning or late afternoon. The reason for this is that it can be the combination of water and heat that causes rot in your plants. Sometimes the water can pool on the foliage, especially in the case of rosette type succulents. This pooling creates a 'magnifying glass effect' with the sunlight, which can cause sun damage.

Remember to water succulents thoroughly, so they can develop a lovely strong, deep, root system. This gives them the best chance to defend themselves against the heat.


For the most part, succulents are very water wise, and generally very tolerant of the heat. But during those times where temperatures start getting above 36/38, and especially for an extended period of time, we need to provide them with just a little more TLC so they can get through the season.